Users
In order to access and use Vital Select and Back Office your staff will need to have a User account. Adding and Editing User accounts is easily done through the Users Page in your Back Office.
The Users Page provides three broad categories for actions you can take to manage User accounts - you can quickly view a list of all existing User accounts that are associated with your business, Add new User accounts to your business, and Edit existing User accounts.
Note
This document provides information regarding Adding and Editing User accounts. Users must be granted permissions via Group membership in order to access Vital Select, Back Office modules, and features. Information regarding assigning Groups and Permissions to User Accounts is available here.
View Users
To view the Users Page, click Staff in the Navigation Menu and then click Users. The Users Page allows you to quickly see a list of all User accounts associated with your business. User accounts are displayed in a table with five columns that provide additional information about each User account. The columns are Username, Name, Email, Last Login, and Locations. By default Users are displayed in alphabetical order by the First Name that is associated with the User account. However, if you would like the list of users to be displayed according to a different order, click on the Column Name by which you wish the list to be ordered.
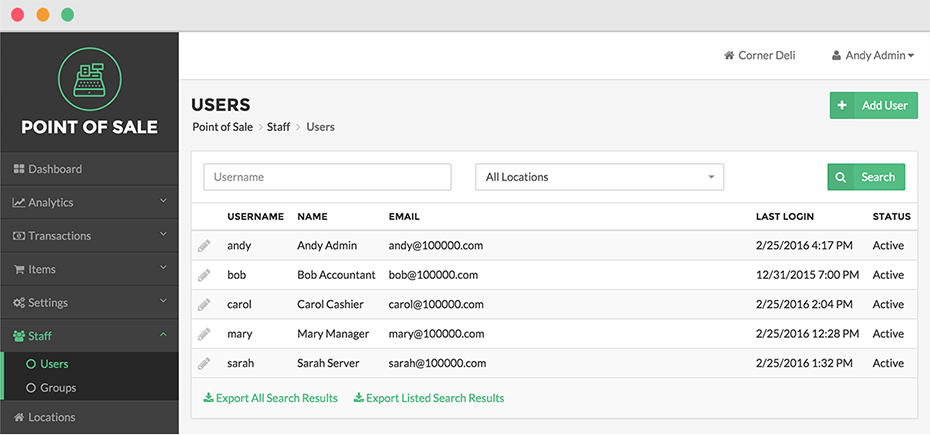
Search Users
The Users Page enables you to quickly view a specific User or Users with the Search feature. Enter a Username in the Username text box and then click the Search Button. The page will use the search term to match against the Usernames of existing User accounts. If a match or multiple matches are found they will be displayed in the User Table. If no matches are found the table will say No Users to List.
Filter Users by Location
If your business has multiple Locations, you can filter the User Table by selecting a specific Location from the Location Drop Down Menu at the top of the table. After selecting a Location, click the Search Button. This will cause the table to display a list of User accounts that are associated with that Location. Any Users not associated with that Location will be excluded from the User Table.
Add User
The Users Page enables you to add new User accounts to your business by clicking the Add User Button. User accounts can be added at any time and you can add as many Users as you need.
Adding a User is a two-step process. In the first step, you will simply need to provide a Username, a First and Last Name, and a Password in the User Details Panel. Optionally, you can also enter an email address to associate with the User account along with a PIN.
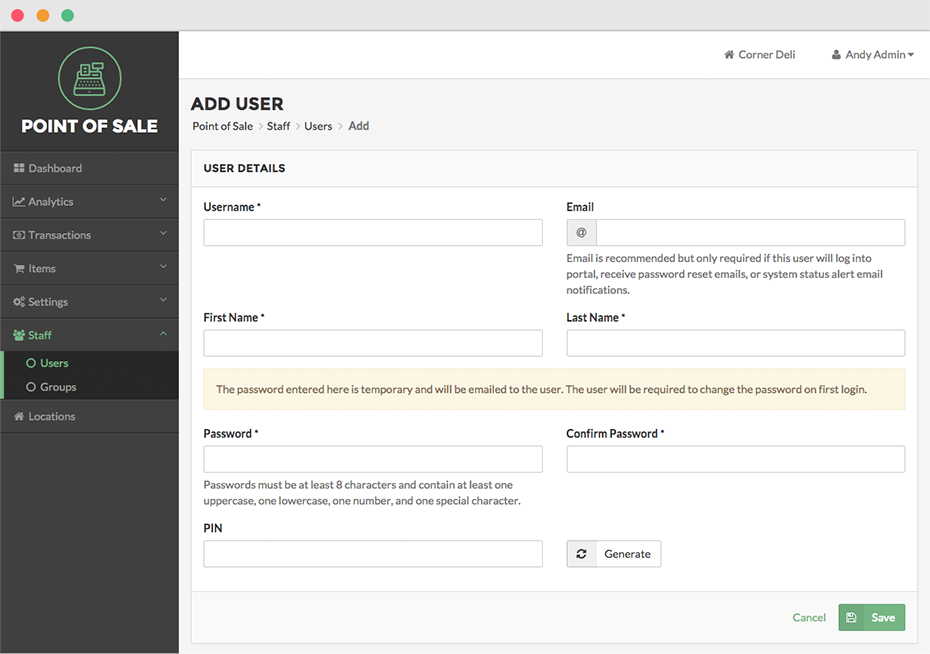
Username
The Username you enter here will be used to log into the Vital Select app. The Username will also appear in Audit details that identify the User that took the action that is the subject of the Audit record.
If any emails need to be sent to the User, they will be sent to the email address you enter here. Typical emails include Password Reset notifications and system status alerts. You will also need to supply an email address if you want the User to be able to access your Back Office.
First Name & Last Name
The First Name & Last Name you enter here will be used in multiple places whenever it is necessary to identify the User that carried out an action in the App or Portal. For example, if the User completes Transactions, the User’s full First Name and Last Name will appear in the Transaction Summary for Transactions the User completes. The First Name & Last initial will appear on Receipts that are printed or emailed to customers.
Password
The password you enter here is temporary and will be emailed to the User if you provide an email address. The User will be required to change the password on first login. You can change the password at any time. The changed password will be emailed to the User if an email is provided and the User will be required to change the password on first login.
PIN
If you have enabled PIN unlock for your business you will have the option of assigning a PIN to the User account being created. You can assign a PIN by manually entering a unique 6-digit number into the PIN input field or by clicking on the Generate PIN Button, which will automatically generate a unique 6-digit number and load it into the PIN input field.
When you have finished entering the relevant information in the User Details Panel, click Save to add the User and proceed to the second step.
In the second step, you will need to assign the User account to a Group or multiple Groups that will define the User’s permissions for accessing Vital Select app and its features, as well as your Back Office and its features. If your business has multiple Locations, you will be able to assign the User to a specific Location or multiple Locations. You will also be able to change the values you have entered in the first stage.
Locations
If your business has multiple Locations, you will be able to use the Locations Panel to assign the new User account to one or more of your Locations.
For more information see the Edit User section below.
Groups
The Groups Panel enables you to assign the new User account to a Group or multiple Groups. Assigning a User to a Group or multiple Groups defines whether the User will be able to access the Vital Select app, your Back Office, and whether the User will be able to use their various features.
For more information see the Edit User section below.
When you are finished making your selections for the new User account, click Done to finish adding the User. This will return you to the Users Page where you can see the User you just finished adding. You can also navigate away from adding a User, after you have saved your selections, by clicking on any options in the Navigation Menu.
Edit User
The Users Page enables you to edit User accounts by clicking the Edit User Button, represented by a Pencil Icon to the left of the Username. The Edit User Page is organized into several panels that allow you to edit various User attributes and save your edits.
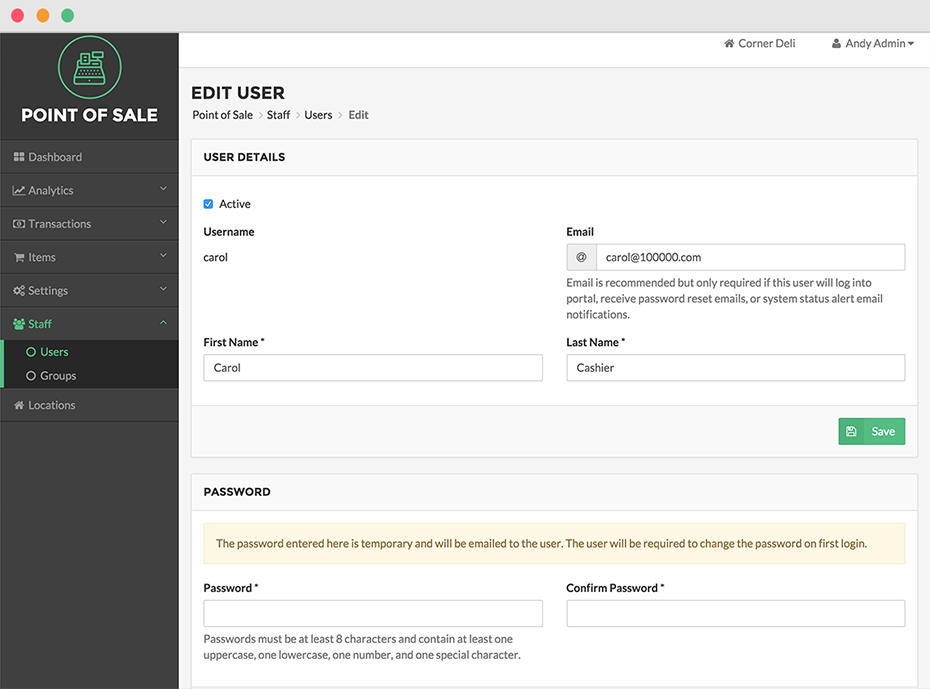
User Details
The User Details Panel on the Edit User Page enables you to edit User details such as Active Status, Email, First Name, and Last Name. Although the Username is displayed in this panel, it cannot be edited after it is set.
Active (Status) – The Edit User Page allows you to set the Status of a User account by checking or unchecking the checkbox labeled Active. When the Active checkbox is checked, the User’s status is set to Active, meaning that this User can access all the components and functionality that are available to them through their Group and Permissions assignment. More information regarding Groups and Permissions is available here.
When the Active checkbox is unchecked, the User’s status is set to Inactive, meaning that this User can no longer access any components or functionality in either the Vital Select app or the Back Office.
Email – If any emails need to be sent to the User, they will be sent to this email address. Typical emails include Password Reset notifications and system status alerts. You will also need to supply an email address if you want the User to be able to access your Back Office.
First Name & Last Name – The First Name & Last Name you enter here will be used in multiple places whenever it is necessary to identify the User that carried out an action in the App or Portal. For example, if the User completes Transactions, the User’s full First Name and Last Name will appear in the Transaction Summary for Transactions the User completes. The First Name & Last initial will appear on Receipts that are printed or emailed to customers.
When you are finished editing the information in the User Details Panel, click the Save Button in the User Details Panel. This will cause the Back Office to save your edits to the information in the User Details Panel and only the information in the User Details Panel.
Password
The Password Panel enables you to edit a User’s password. You can edit the password at any time. The edited password will be emailed to the User, if an email is provided, and the user will be required to change the password on first login.
When you are finished editing the User password, click the Save Button in the Password Panel. This will cause the Back Office to save your edits to the password and only the edits to the password.
PIN
If you have enabled PIN unlock for your business you will have the option of assigning a PIN to the User account being created. You can assign a PIN by manually entering a unique 6-digit number into the PIN text box or by clicking on the Generate PIN Button, which will automatically generate a unique 6-digit number and load it into the PIN text box.
When you are finished with editing the User PIN, click the Save Button in the PIN Panel. This will cause the Back Office to save your edits to the PIN and only the edits to the PIN.
Locations
If your business has multiple Locations, you will be able to use the Locations Panel to edit the User’s Location assignments. For each Location you select, the User will have the ability to access the functionality and components that have been made availavle to the User based on the Group or Groups you assigned the User to. More information regarding Groups and Permissions is available here. If you wish to remove a Location from the User’s Location assignment, simply uncheck the checkbox next to the Location’s name in the Locations Panel.
If your business has one Location, the user is automatically assigned to that Location, thereby saving you the effort of having to assign a Location manually. Consequently, you will not see the Locations Panel.
When you are finished with editing the Location assignments in the Locations Panel, click the Save Button in the Location Panel. This will cause the Back Office to save your edits to the location assignments in the Locations Panel and only the Location assignments in the Locations Panel.
Groups
The Groups Panel enables you to edit the User’s Group assignments. Assigning a User to a Group or multiple Groups defines whether the User will be able to access the Vital Select app, your Back Office, and whether the User will be able to use their various features. More information regarding Groups and Permissions is available
If you wish to remove the User from a Group, simply uncheck the checkbox next to the Group’s name in the Groups Panel.
When you are finished with editing the Group assignments in the Groups Panel, click the Save Button in the Group Panel. This will cause the Back Office to save your edits to the Group assignments in the Groups Panel and only the Group assignments in the Groups Panel.
When you are finished making your selections, click Done to return to the Users Page where you can see the User you just finished editing. You can also navigate away from editing a User, by clicking on any option in the Navigation Menu. Be sure to save your edits before navigating away from the Edit User Page.