Partial Refunds Using the App
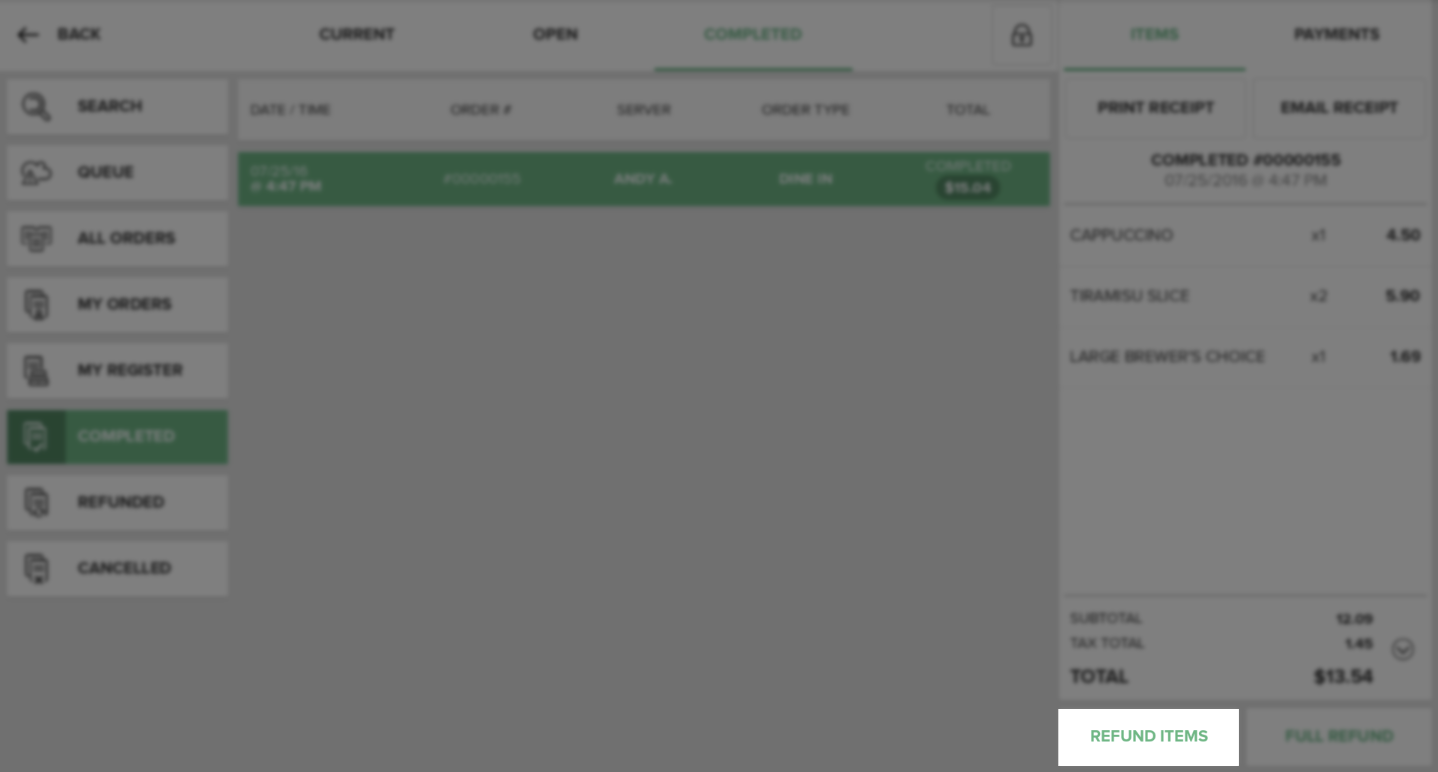
Partial Refunds are ideal for situations in which a customer orders multiple Items, and has decided to return only some of the Items from the Transaction. You can issue Partial Refunds directly from the Vital Select point-of-sale in just a few easy steps. To begin a Partial Refund, tap the Orders Button on the Home Screen, and then select the Sales/Completed Tab at the top of the screen. On the Sales/Completed Tab, select the Completed Button from the left column. All of the completed transactions in the current Batch will appear in the center of the screen. Locate the transaction for which you would like to complete a Partial Transaction and tap it. This will populate the Receipt Viewer on the right side of the screen with the information about that transaction. Next, tap the Refund Items Button below the Receipt Viewer. You will be navigated to the Item Selection Screen to complete the Partial Refund Process.

Item Selection Screen Elements
The Item Selection screen displays information about the selected transaction and the Items associated with the transaction.
Order Information Panel
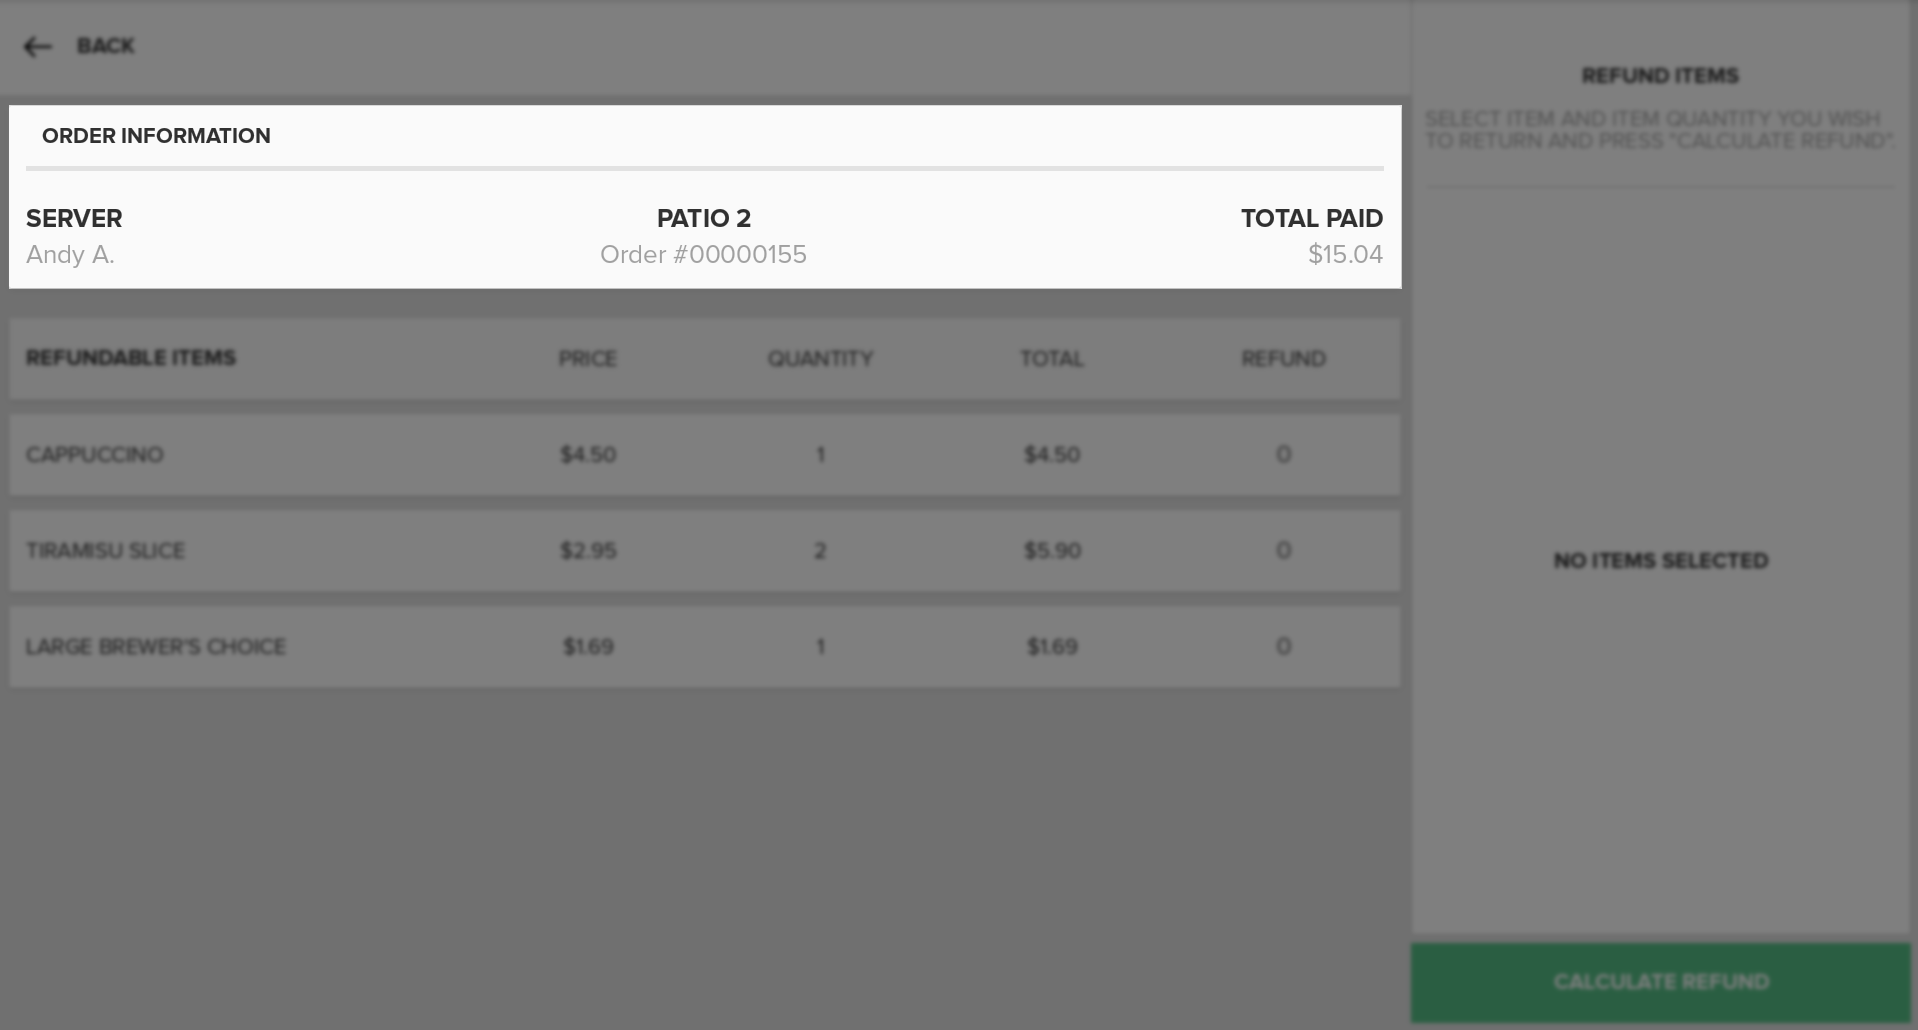
At the top of the Item Selection Screen you will see the Order Information Panel that provides an overview of the transaction. On the left side of the panel is the name of Server or Associate who took the Order. In the center of the panel the Register that the Order was taken on is listed, as well as the corresponding Order Number for the transaction. Lastly, on the right side of the panel is Total Paid for the transaction.
Items List
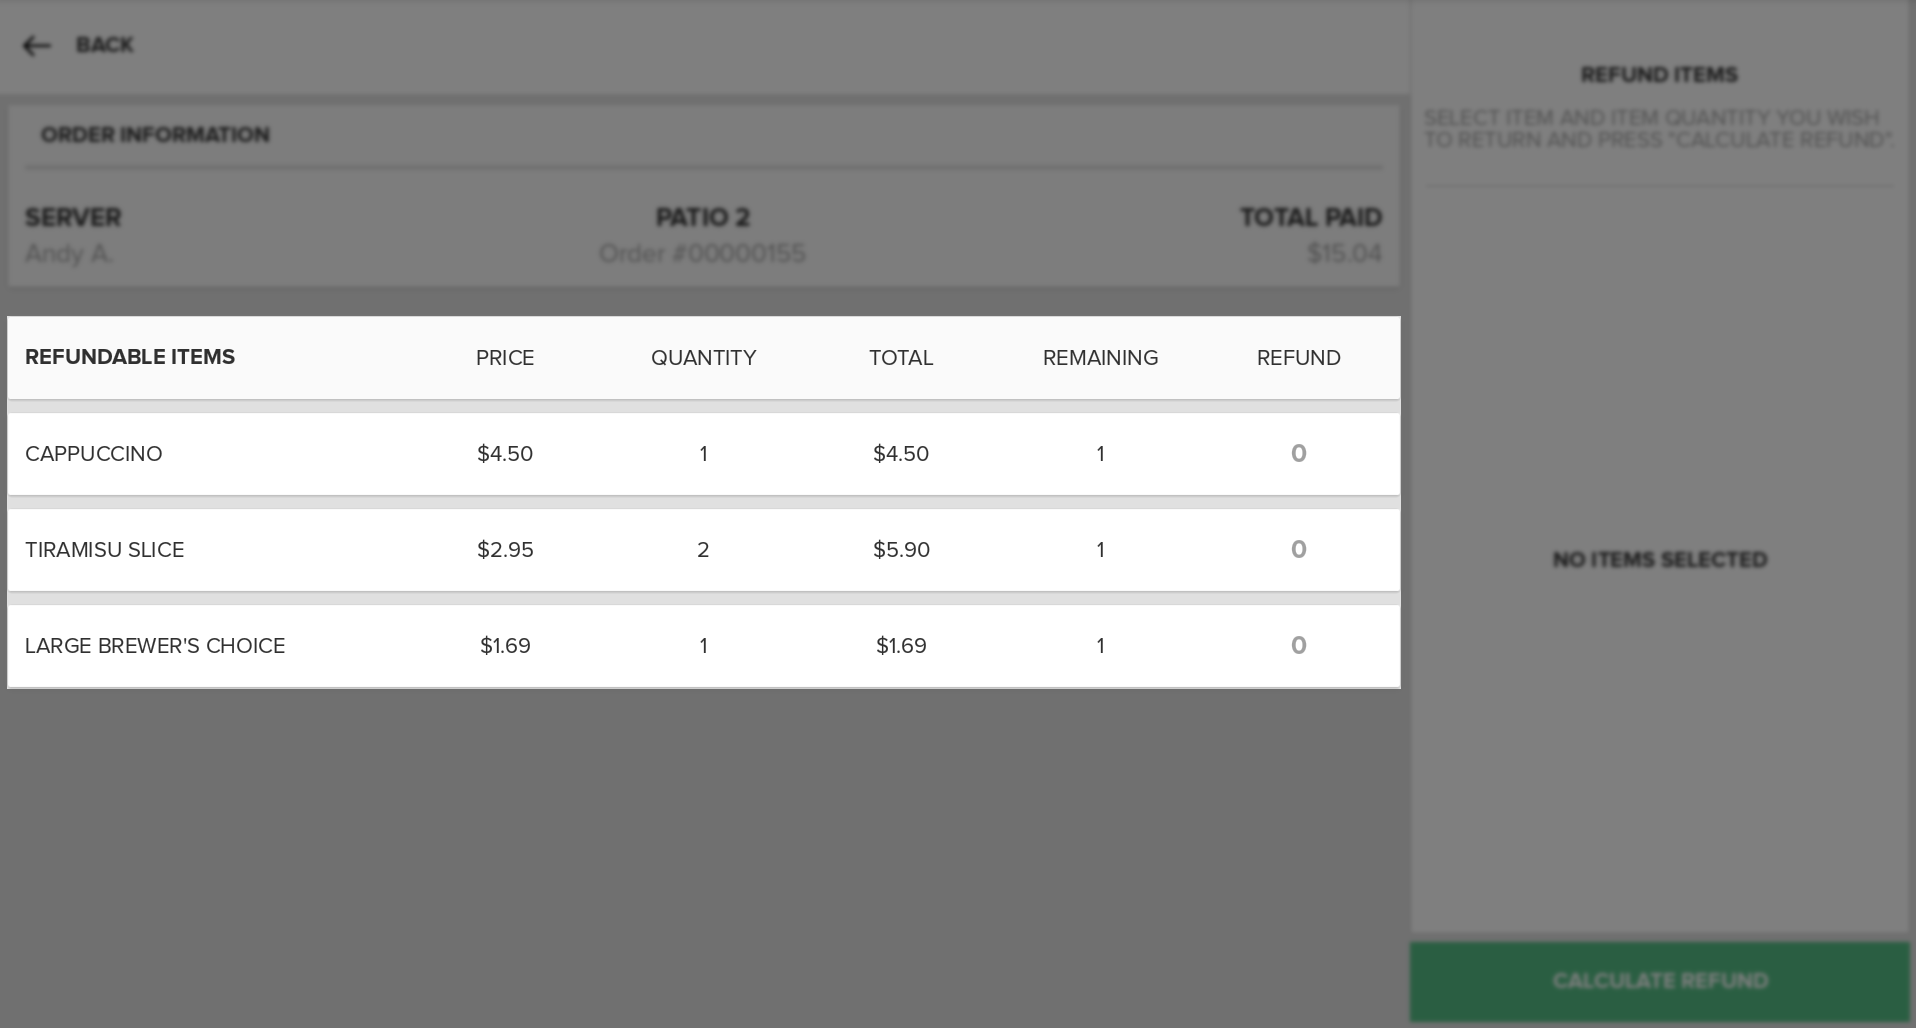
Below the Order Information Panel you will see a list of the Items in the Order. The list is broken up into two sections, Refundable Items and Non-Refundable Items. Refundable Items are those Items in the Order that qualify for a refund. Non-Refundable Items, on the other hand, cannot be Refunded, either because the Items have already been Refunded, or because they do not qualify for a Refund (i.e. a cheeseburger that the customer Ordered the week before).
For each Item in the list, you will see the Item Name, Price, Quantity, Total, Remaining Quantity, and Refund Quantity. Any Items that have Modifiers associated with them will display those Modifiers below the Item.
Item Name:
The name of the Item as you assigned it in the Portal. For example, White T-Shirt.
Modifier:
If there are any Modifiers for the Item, they will be listed below the Item Name. For example, if the customer purchased the White T-Shirts in a Size Small, the Modifier Size Small will be displayed under White T-Shirts.
Price:
The price of the Item as you assigned it in the Portal. This is the price of a single Item.
Quantity:
The number of the Item purchased during the transaction. For example, if the customer purchased five White T-Shirts, on the White T-Shirt Item Panel, the Quantity will be 5.
Total:
The total amount paid for the total number of Items at the time of the transaction. For example, if the Price of a single White T-Shirt is $4.00, and the customer purchased 5 White T-Shirts, the total will be $20.
Note:
If there are taxes applied to the purchase, the tax amount will also be reflected in the Total.
Remaining:
The number of Items that are not being returned. For example, the customer purchased 5 White T-Shirts originally, and chooses to return 3 of those shirts, the Remaining Quantity will be 2.
Refund:
In the Refundable Items list this shows the number of Items that the customer is returning and receiving a Partial Refund for. In the Non-Refundable Items list it shows the number of Items that have already been Refunded, or the column will show a dash, indicating that the Items were not returned and are not eligible for a Refund.
Item States
Each Item in the list will either have a white or a green background, depending on whether or not it has been selected for a Refund, or if it is not available to be Refunded.
Default:
The default state for Items that are in the Refundable Items List displays as a white background with black text. These Items can be selected for a Refund, but have a current Refund Quantity of zero, meaning they have not yet been selected for the Refund.
Refund:
When an Item as been selected for a Refund, and you have chosen the quantity of that Item to be Refunded, the Item will then have a green background with white text.
Non-Refundable:
When an Item is listed in the Non-Refundable List, it will appear with a white background with red text.
Refund Quantity Pop-up
When you tap on an Item in the Refundable Items List, the Refund Quantity Pop-up will appear. Here, you can use either the plus and minus buttons or the number pad to enter the quantity of the Item that is to be refunded. Once you have the correct number selected, press the Continue Button. This will dismiss the pop-up and add the Refund Quantity to the Receipt Viewer on the right side of the screen. To exit the Refund Quantity Pop-up without adding the Items to the Receipt Viewer to be refunded, press the Back Button.
Note:
If the Quantity of the Item you tap is 1, then the Refund Quantity Pop-up will not appear. Rather, the single Item will automatically be added to the Receipt Viewer for a refund. If you tap an Item in the Non-Refundable List, a message will appear telling you that the Item cannot be Refunded.
Receipt Viewer
On the right side of the screen you will see the Receipt Viewer, just like you would on any other Orders screen. After you have selected an Item to be refunded, the Item will appear in the Receipt Viewer. You will see the Item Name, and associated Modifiers for the Item, the Refund Quantity, and the Total Amount to be refunded for the Item(s).
Calculate Refund Button
When you have finished adding Items to be refunded, you may press the Calculate Refund Button. This will direct you to the Tender Selection screen to complete the Partial Refund Process.
Back Button
If at any point you no longer want to complete the Partial Refund, you can press the Back Button in the top left corner of the screen. You will be taken back to the Sales/Completed Tab of the Orders Screen.
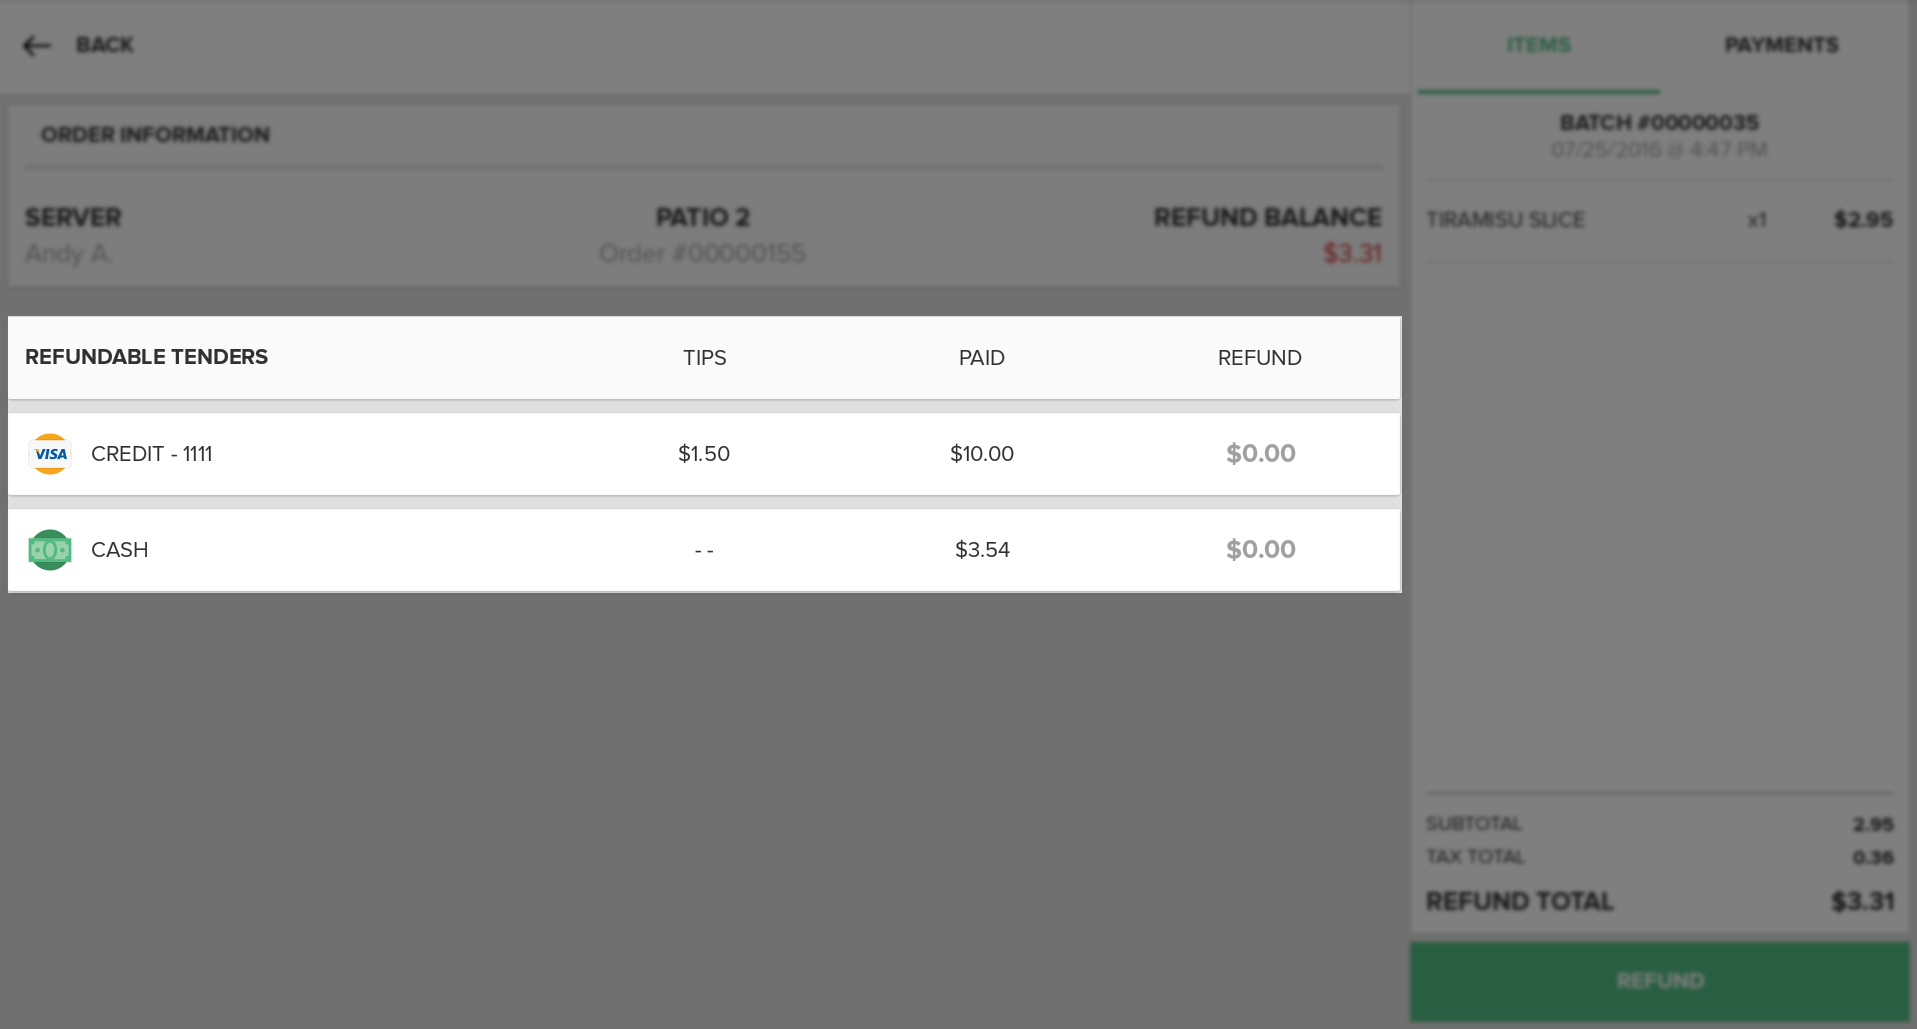
Tender Selection Screen Elements
The Tender Selection Screen displays information about the transaction that is being partially refunded, the Refund Balance, and the Tenders associated with the transaction.
Order Information Panel
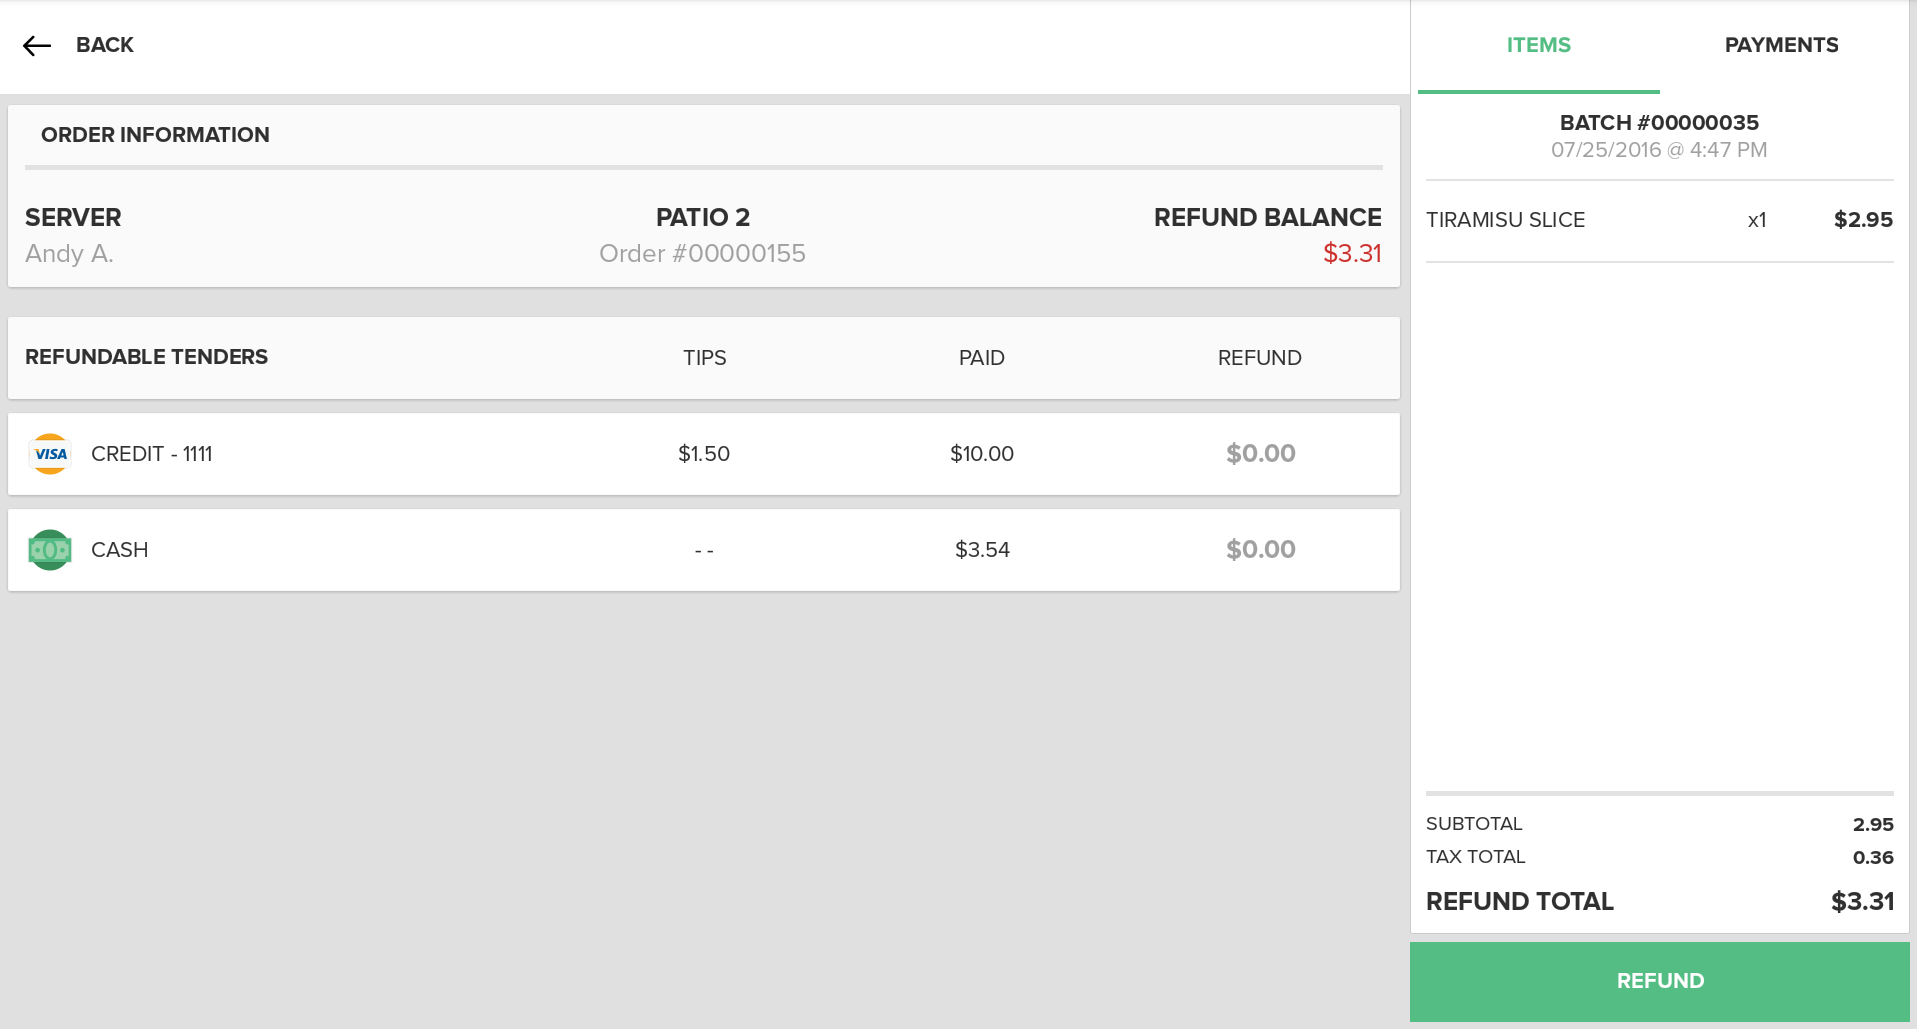
At the top of the Tender Selection Screen you will see the Order Information Panel that provides an overview of the transaction. Similarly to the Order Info Panel on the Items Selection Screen, on the left side of the panel is the name of Server or Associate who took the Order. In the center of the panel the Register that the Order was taken on is listed, as well as the corresponding Order Number for the transaction. The main difference on this panel is that on the right side of the panel is Refund Balance for the Partial Refund.
The Refund Balance is based on the original amount paid for the Item(s) you selected on the Item Selection Screen. The total amount to be refunded is the Refund Balance. You must refund the entire Refund Balance, nothing more or less. To change the Refund Balance, you will need to return to the Item Selection Screen and change the Items were selected for the refund.
As you apply a Refund Amount to Tenders on the Tender Selection Screen, the amount applied to a Tender will be deducted until Refund Balance is $0.00. If there is only one Tender for the transaction, the Refund Balance will be displayed as $0.00, since the total Refund Amount will be automatically applied to the sole Tender.
Tenders List
Below the Order Information Panel you will see a list of the Tenders used to pay for Order. The list is broken up into two sections, Refundable Tenders and Non-Refundable Tenders. Refundable Tenders qualify for a refund because they have not yet been refunded. Non-Refundable Items, on the other hand, cannot be refunded because the Tenders have already been completely refunded.
For each Tender in the list, you will see the Tender Icon, Tender Type, Tip Amount, Paid Amount, Remaining Amount, and Refund Amount. Any Items that have Modifiers associated with them will display those Modifiers below the Item.
Tender Icon:
The Tender Icon will vary depending on the Tender Type. For example, if the Tender is cash, you will see a dollar bill icon, whereas if it is a credit card, you will see a credit card icon corresponding to the type of credit card used (e.g. Visa, MasterCard, etc).
Tender Type:
The type of Tender used for the transaction. This can be credit, debit, Gift Card, Gift Certificate, cash, or check. For credit, debit, and Gift Card Tenders, the last 4 digits of the card will appear after the Tender Type.
Tips:
The total Tip Amount left for that Tender Type. If no Tip is associated with a Tender, you will see a dash.
Paid:
The total amount paid with the Tender in the selected transaction.
Remaining:
This is the amount of the total paid left that is available to be refunded. If the Tender has not yet been refunded, this number will be equal the number in the Paid Amount Column. If the Tender has been previously partially refunded, then this column will display the difference of the Paid Amount and the Refunded Amount.
Refund:
By default, this column will display the number 0. However, after you have entered Refund Amount for a Tender, the amount to be refunded will appear here.
Tender States
Each Tender in the list will either have a white or a green background, depending on whether or not it has been selected for a Refund, or if it is not available to be Refunded.
Default:
The default state for Tenders that are in the Refundable Tenders List displays as a white background with black text. These Tenders can be selected for a Refund, but they have a current Refund Amount of zero, meaning they have not yet been selected to be refunded.
Refund:
When a Tender has been selected to receive a refund, and you have chosen the Refund Amount for that Tender, the Tender will then have a green background with white text.
Non-Refundable:
When a Tender is listed in the Non-Refundable List, it will appear with a white background with red text.
Refund Amount Pop-up
If the selected transaction has multiple Tenders applied to it, you are able to choose which Tenders to refund, and the amount to refund to each specific Tender. To apply a Refund Amount to a Tender, tap the Tender in the center of the screen. The Refund Amount Pop-up will appear. Enter the amount to be refunded to that Tender using the plus/minus buttons or the keypad on the pop-up. If a Tip was applied using that Tender, you may choose to include the Tip Amount in the Refund Total by checking the box next to the Tip Amount on the pop-up. Once you have entered the Refund Amount, press the Continue Button to add that refund amount to the Tender. You will see the Tender and the amount to be refunded to it listed on the Payments Tab of the Receipt Viewer on the right side of the screen. If you decide you no longer wish to apply a refund to the selected Tender, press the Back Button to dismiss the pop-up.

Note:
If the Refund Balance is greater than the amount paid using a certain Tender, you may only refund the total amount paid on that Tender. The remaining Refund Balance will need to be applied to an alternate Tender.
Include Tip Pop-up
If there is only one Tender associated with the selected transaction, the entire Refund Balance will be automatically applied to that Tender. Therefore, tapping on the Tender in the center of the screen will not load the Refund Amount Pop-up. However, if there was a tip applied to the transaction, the customer may decide they would like to refunded for that amount as well. To add the Tip Amount to the Refund Total, tap the Tender. The Include Tip Pop-up will appear. The pop-up will display the total Tip Amount and a message asking if you would like to include the Tip in the refund. If you are sure you want to include the Tip Amount, tap the Yes Button. If not, press the No Button.
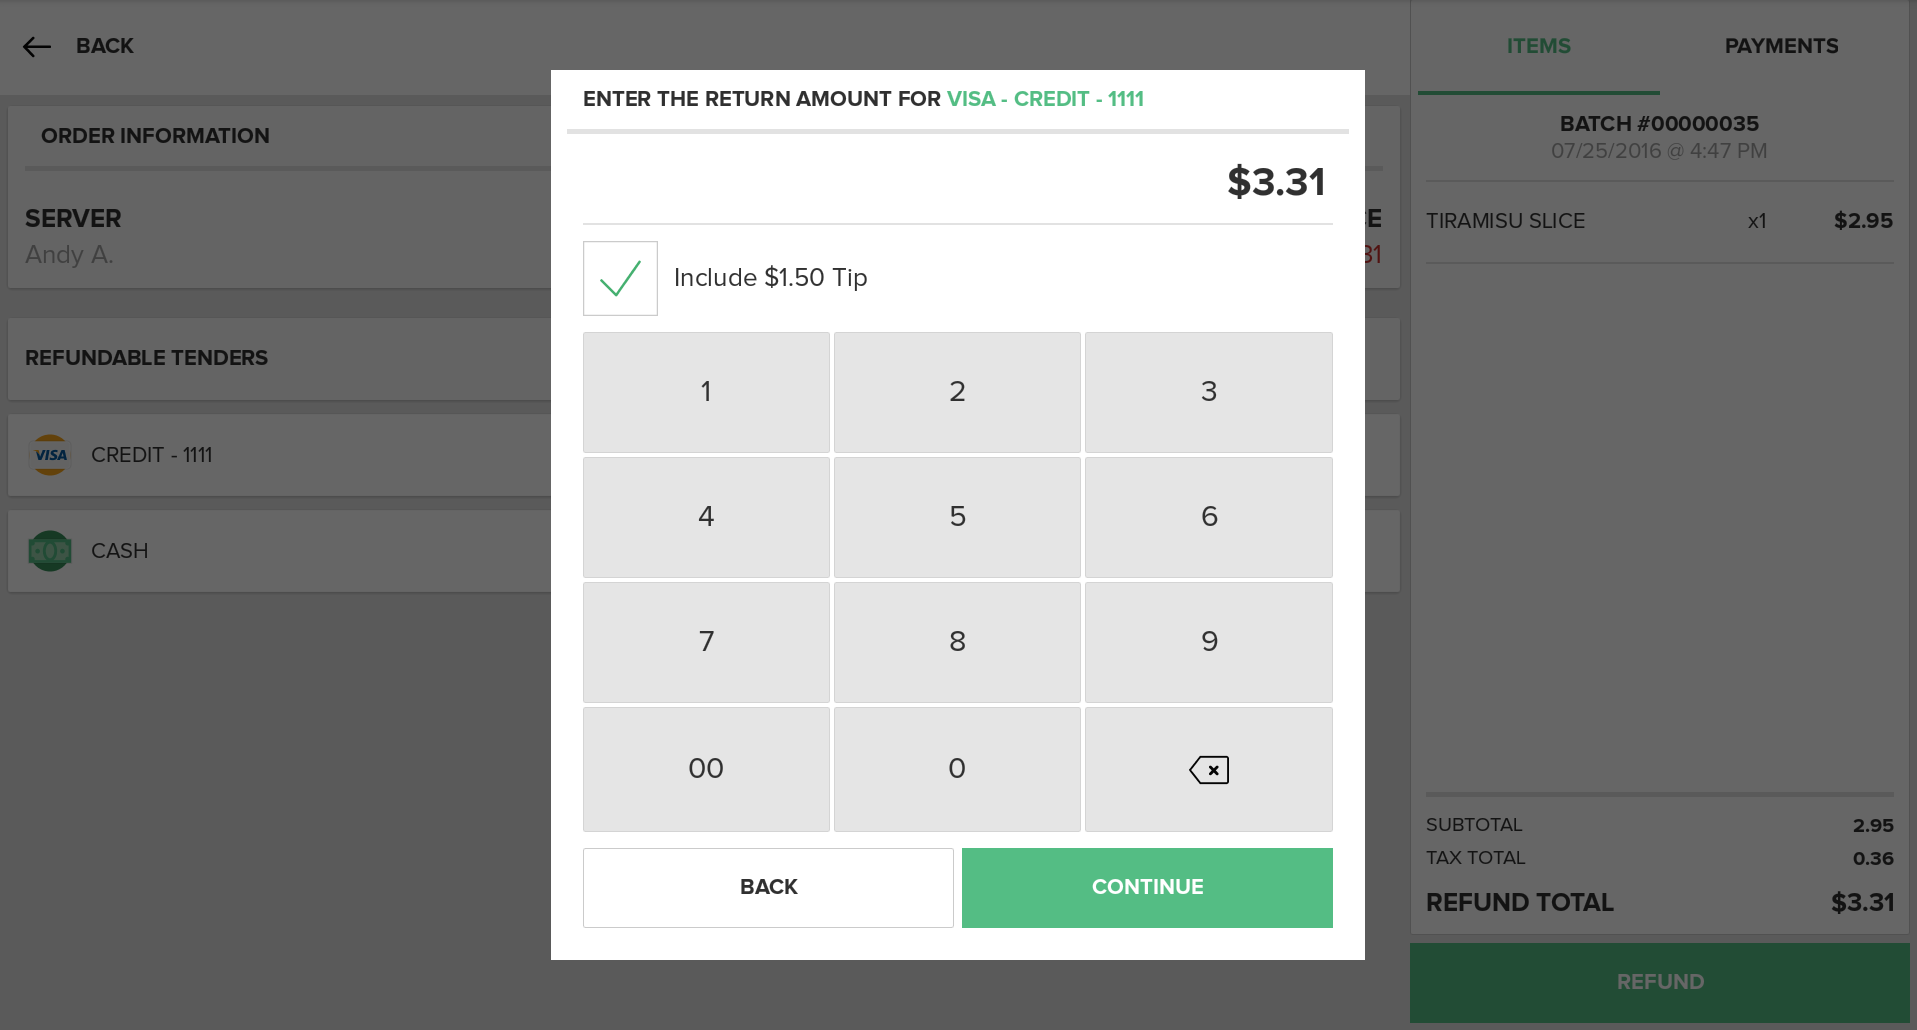
Note:
You are not able to include a partial Tip Amount. You must refund the entire Tip Amount.