Groups
Note
This document provides information regarding Viewing, Adding and Editing Groups and Assigning Permissions. Information regarding Viewing, Adding, and Editing User Accounts is available here.
The Back Office makes it easy for you to control which Users have access to Vital Select and Back Office and what functionality is available to those with access. You can do this by assigning Users to Groups and assigning Permissions to Groups. Users assigned to a Group will have the Permissions that were assigned to that Group, and consequently will have access to the functionality, screens, and pages controlled by the predetermined Permissions.
It may be useful to think of Groups as corresponding to roles within your business. For example, if your business is a restaurant, it may be useful to have a Group that corresponds to the server role. You can then assign the Permissions that are necessary for a server to perform the server role to that Group – e.g. the ability to log into Vital Select, the ability to take orders, and the ability to hold orders. From the Users Page, you can assign your servers as Users to the Group that corresponds to the server role. As long as you do not assign them to any other Groups, these Users will only have the Permissions to access Vital Select and carry out functions controlled by the Permissions you assigned to that Group.
The Groups Page is found under Staff in the Navigation Menu. The Groups Page provides four actions you can take to manage Groups: you can quickly view a list of all existing Groups in the Groups Table, you can Add new Groups and assign Permissions to them, you can Edit existing Groups and their existing Permission assignments, and you can Delete Groups.
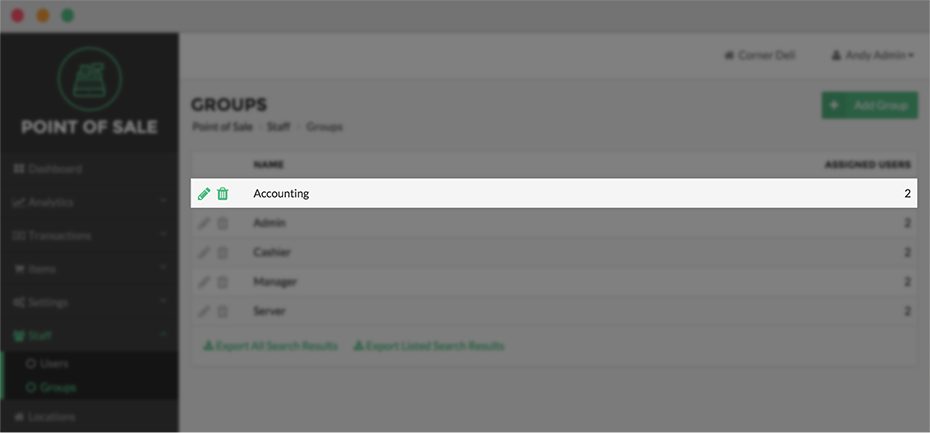
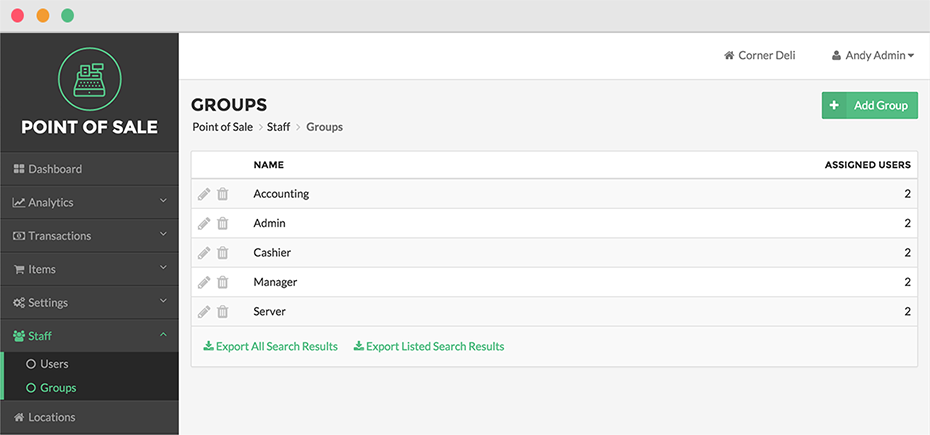
View Groups
The Groups Page allows you to quickly see a list of all Groups associated with your business. Groups are displayed in a table with two columns that provide the Name of each Group and the number of Users assigned to the Group. By default Groups are displayed in alphabetical order. However, if you would like the list of Groups to be displayed according to a different order, click on the column name by which you wish the list to be ordered.
Add Group
You can add new Groups on the Groups Page by clicking the Add Group Button. Groups can be added at any time and you can add as many Groups as you need. Adding a Group is a two-step process: in the first step you Add a Group and in the second step you will Edit the newly added Group on the Edit Group Page.
In the first step, you will simply need to provide a Group Name that you want to use for the Group. The name must be unique. Your business cannot have more than one Group with the same name. When you have finished entering a name for the Group, click Save to Add the Group and proceed to the Edit Group Page.
In the second step, use the Edit Group Page to edit the name of the Group and assign Permissions to the Group.
Edit Group
When you add a new Group, you are automatically taken to the Edit Group Page. You can also get to the Edit Group Page from the Groups Page by clicking the Edit Group Button, represented by a Pencil Icon that appears to the left of each Group Name in the table. The Edit Group Page includes a Name Panel and a Permissions Panel.

Name Panel
The Name Panel enables you to edit the name of the Group. The name must be unique.
When you have finished editing the name of the Group, click the Save Button in the Name Panel. This will cause the Back Office to save your edits to the name of the Group and only the edits to the name of the Group.
Permissions Panel
The Permissions Panel enables you to assign Permissions to the Group you are editing. Assigning Permissions to a Group defines whether the Users assigned to the Group will be able to access Vital Select app, Back Office, and whether Users will be able to use the various features of each. More information regarding assigning Users to Groups is available here.
The Permissions Panel provides a list of all Permissions available to you. The Permissions are organized into the following Categories: Access, Inventory, Location, Management, Register, Security, and Transactions. The name of the category is displayed in bolded, all caps letters in a row above the relevant permissions.
To assign all Permissions within the Category to a Group, simply click on the checkbox next to the Category Name. To un-assign, click on the checkbox until the check is removed from the checkbox.
To select a specific Permission to assign to the Group, click on the checkbox next to the specific Permission you wish to assign. To un-assign, click on the checkbox until the check is removed from the checkbox.
When you have completed selecting the Permissions you wish to assign to the Group, click on the Save Button at the bottom of the Permissions Panel. This will save the Permission assignments you have made in the Permissions Panel.
After you have finished editing the Group Name and saved your Permissions assignments, you can click the Done Button to return to the Groups Page.
Delete Group
You can delete a Group from the Groups Page by clicking on the Delete Button represented by a Trash Icon that appears to the left of each Group Name displayed in the Groups Table.
Clicking the Delete Button causes a Pop-up to appear prompting you to confirm that you want to delete the Group. If you are sure you want to delete the Group, click OK. If you do not want to delete the Group, click Cancel.
Deleting a Group will immediately affect all users that were assigned to the deleted Group. The users assigned to the deleted Group will no longer be able to access Vital Select or Back Office or perform any functions that were dependent on having Permissions that were assigned to the deleted Group.