How to Edit Registers
To Edit a Register in the Merchant Portal, begin by selecting Store Setup on the left side of the Navigation Menu, and then select Registers in the listings. On the Registers Page, click the Edit Register Button, represented by a Pencil Icon, on the left of the Register you wish to edit.

On the Edit Register Page, edit the Register details and set the Register status.
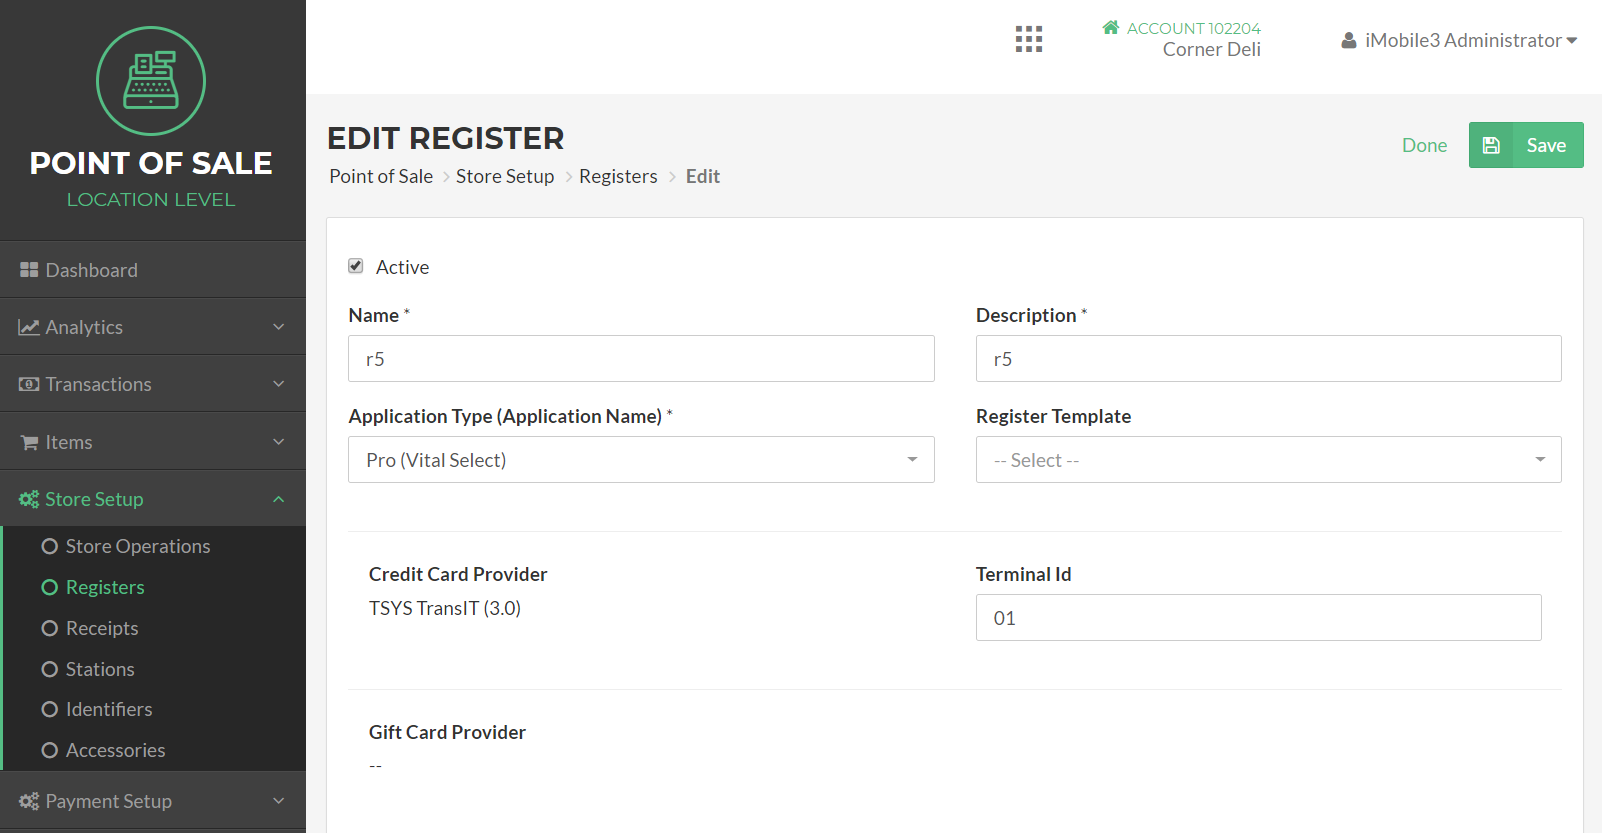
How To Edit Register Details
On the Edit Register Page, you can edit the Register Details in the top panel.
Status – A Register can either be Active or Inactive. When a Register is Active, it is available for normal use. When a Register’s Status is set to Inactive, Users will not be able to login to Vital Select using that Register. To set a Register as Active, check the checkbox next to Active. To set it to Inactive, uncheck the checkbox.
Name – The name is used to identify the Register. For example, in transaction listings, each transaction will have a field noting the Register that was used for the transaction. This name will reflect what you enter on this page. To edit the Register Name, click inside of the Name Text Box and type your changes.
Description – This description will be used as an additional way for you to differentiate one register from another. To edit the Register Description, click inside of the Description Text Box and type your changes.
Gateway Terminal ID – Enter the Gateway Terminal ID that was issued for you to use.
Gift Terminal ID – Enter the Gift Terminal ID that was issued for you to use.
Item Type – Select the Item Type that will be associated with this Register. Item Type refers to the version of the Vital Select app that will be used by this Register. The differences between Vital Select Item Types may include the availability of features and support for hardware like printers.
Unassign – To unassign the Register, click the Unassign Button in the bottom left corner of the Register Details Panel. You can only unassign a Register if the Register has a device associated with it. Meaning that you or your staff, have logged into the iMobile3 POS with a device and selected that specific Register during the initial login.
When you have completed editing Register Details, click the Save Button in the bottom right corner of the Register Details Panel. If you wish to cancel without saving your edits to the Register, click Done at the bottom of the screen.
Quick Summary
- Click Store Setup on the left side of the Navigation Menu, and then choose Registers from the listings.
- On the Registers Page, click the Edit Register Button next to the Register you wish to edit.
- On the Edit Register Page edit the Register Details and set the Register status in the Register Details Panel.
- Click the Save Button in the Register Details Panel when finished.
- Click Done at the bottom of the screen to return to the Registers Settings Page.
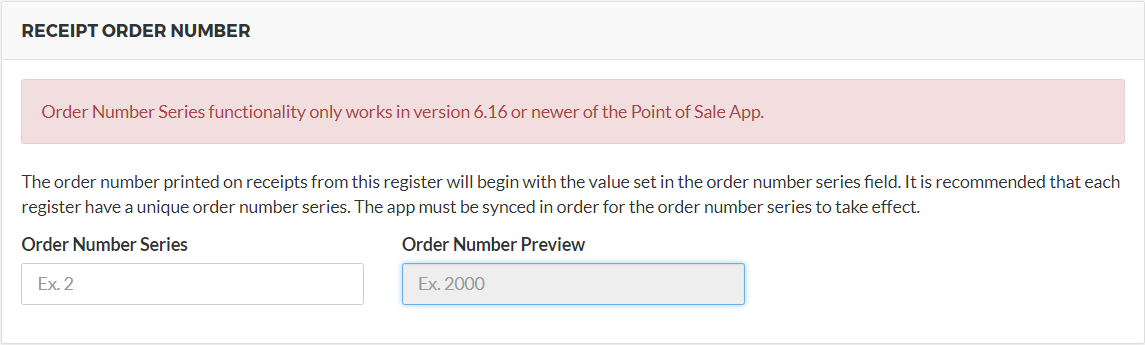
HOW TO ASSIGN A RECEIPT ORDER NUMBER
Order Numbers on printed and emailed receipts can be confusing when using more than one register at a single location. This is because the order numbers automatically default to a numerical value that is sequential, starting at 1, and will increase with each new order generated. These numerical values will be reset whenever a batch is closed and a new batch is opened for a register. To help prevent there from being multiple orders with the same order number you can assign a prefix number to the order numbers. The prefix is a two digit number that is added to the beginning of the order number and will be unique to each register. By setting the prefix for each register differently you will then be able to easily distinguish between orders that are placed from multiple registers.
To assign a Receipt Order Number prefix, click Store Setup in the Navigation Menu and then select Registers in the Expanded Menu. On the Registers Page, click the Edit Register Button, represented by a Pencil Icon, to the left of the Register to which you wish to assign a Receipt Order Number to.
In the Receipt Order Number panel on the Edit Register page, click the Order Number Series text box and enter a unique one or two digit number that you wish to become the prefix to the Order Number. To the right of the Order Number Series text box there is a Order Number Preview box. This display an example of what the Receipt Order Number will look like on a printed or emailed receipt when an order is generated. Click the Save Button at the bottom of the screen.
Note:
Order Number Series functionality is only available in versions 6.16 or newer of the POS application.
Quick Summary
- Click Store Setup in the Navigation Menu.
- Click Registers in the Expanded Menu.
- Click the Edit Button next to the Register to which you wish to assign a Receipt Order Number to
- Click the Order Number Series text box.
- Enter a unique one or two digit number that you wish to become the prefix to the Order Number
- Preview the example in the Order Number Preview box
- Click the Save Button at the bottom of the screen
HOW TO ASSIGN AN ACCESSORY DISPLAY TO A REGISTER
Some point-of-sale units have Accessory Display capabilities for displaying splash images, ad images, and receipt information. Splash images are large images capable of being displayed across the entire screen – some merchants use these to advertise promotions, or display their logo more generally. Ad images are smaller images displayed alongside receipt information. For those point-of-sale units with Accessory Display capabilities, learn how to configure your Accessory Display Settings here.
To assign an Accessory Display to a Register, click Store Setup in the Navigation Menu and then select Registers in the Expanded Menu. On the Registers Page, click the Edit Register Button, represented by a Pencil Icon, to the left of the Register to which you wish to assign an Accessory Display.
In the Accessory Display Panel on the Edit Register Page, click the left drop down menu and choose which Accessory Display you would like to assign to the Register. Once you have selected an Accessory Display, the Connection Drop Down Menu will become available; click on it and select how your Register will connect to the Accessory Display (via Bluetooth, USB, or TCP/IP). Once you select your Connection Type, if a Bluetooth Address or IP Address is required, the Address Text Box will become available. You will need to enter the appropriate address in this text box to ensure that the Register and Accessory Display can connect properly. Click the Save Button at the bottom of the screen.

QUICK SUMMARY
- Click Store Setup in the Navigation Menu.
- Click Registers in the Expanded Menu.
- Click the Edit Button next to the Register to which you wish to assign an Accessory Display.
- In the Accessory Display Panel, click the left drop down menu
- Choose which Accessory Display you would like to assign to the Register
- In the Connection Drop Down Menu, select how your Register will connect to the Accessory Display
- If a Bluetooth Address or IP Address is required, the Address Text Box will become available
- Enter the appropriate address in the Address Text Box
- Click the Save Button at the bottom of the screen
HOW TO ASSIGN A CONSUMER FACING LCD TO A REGISTER
Customer Facing LCDs are also supported by some point-of-sale units, which may be useful for allowing customers to review orders while they are being checked out.
To assign a Consumer Facing LCD to a Register, click Store Setup in the Navigation Menu and then select Registers in the Expanded Menu. On the Registers Page, click the Edit Register Button, represented by a Pencil Icon, to the left of the Register to which you wish to assign a Consumer Facing LCD.
In the Consumer Facing LCD Panel on the Edit Register Page, click the left drop down menu and choose which Consumer Facing LCD you would like to assign to the Register. Once you have selected a Consumer Facing LCD, the Connection Drop Down Menu will become available and automatically filled in with USB. This is because Consumer Facing LCDs are either built into the hardware of the point-of-sale, or connected with a USB. Bluetooth and TCP/IP are not available for connecting Consumer Facing LCDs. Click the Save Button at the bottom of the screen.

QUICK SUMMARY
- Click Store Setup in the Navigation Menu.
- Click Registers in the Expanded Menu.
- Click the Edit Button next to the Register to which you wish to assign a Consumer Facing LCD
- In the Consumer Facing LCD Panel, click the left drop down menu
- Choose which Consumer Facing LCD you would like to assign to the Register
- The Connection Drop Down Menu will become available and automatically filled in with USB
- Click the Save Button at the bottom of the screen
HOW TO ASSIGN A SCANNER TO A REGISTER
Barcode Scanners are an integral part of many restaurant, retail, and service industry operations. Some all-in-one point-of-sale solutions have built-in scanning devices, while others support third party, stand-alone scanners.
To assign a Scanner to a Register, click Store Setup in the Navigation Menu and then select Registers in the Expanded Menu. On the Registers Page, click the Edit Register Button, represented by a Pencil Icon, to the left of the Register to which you wish to assign a Scanner.
In the Scanner Panel on the Edit Register Page, click the left drop down menu and choose which Scanner you would like to assign to the Register. Once you have selected a Scanner, the Connection Drop Down Menu will become available; click on it and select how your Register will connect to the Scanner (via Bluetooth, USB, or TCP/IP). Once you select your Connection Type, if a Bluetooth Address or IP Address is required, the Address Text Box will become available. You will need to enter the appropriate address in this text box to ensure that the Register and Scanner can connect properly. Click the Save Button at the bottom of the screen.

QUICK SUMMARY
- Click Store Setup in the Navigation Menu.
- Click Registers in the Expanded Menu.
- Click the Edit Button next to the Register to which you wish to assign a Scanner
- In the Scanner Panel, click the left drop down menu
- Choose which Scanner you would like to assign to the Register
- In the Connection Drop Down Menu, select how your Register will connect to the Accessory Display
- If a Bluetooth Address or IP Address is required, the Address Text Box will become available
- Enter the appropriate address in the Address Text Box
- Click the Save Button at the bottom of the screen
HOW TO ASSIGN A PAYMENT TERMINAL TO A REGISTER
Payment Terminals are an essential part of processing credit and debit transactions for merchants of all types.
To assign a Payment Terminal to a Register, click Store Setup in the Navigation Menu and then select Registers in the Expanded Menu. On the Registers Page, click the Edit Register Button, represented by a Pencil Icon, to the left of the Register to which you wish to assign a Payment Terminal.
In the Payment Terminal Panel on the Edit Register Page, click the top left drop down menu and choose which Payment Terminal you would like to assign to the Register. Once you have selected a Payment Terminal, the Connection Drop Down Menu will become available; click on it and select how your Register will connect to the Payment Terminal (via Bluetooth or USB). Once you select your Connection Type, if a Bluetooth Address is required, the Address Text Box will become available. You will need to enter the appropriate address in this text box to ensure that the Register and Payment Terminal can connect properly. Finally, in the Port Text Box, enter the corresponding Port Number for the Payment Terminal. Click the Save Button at the bottom of the screen.

QUICK SUMMARY
- Click Store Setup in the Navigation Menu.
- Click Registers in the Expanded Menu.
- Click the Edit Button next to the Register to which you wish to assign a Payment Terminal
- In the Payment Terminal Panel, click the left drop down menu
- Choose which Payment Terminal you would like to assign to the Register
- In the Connection Drop Down Menu, select how your Register will connect to the Payment Terminal
- If a Bluetooth Address required, the Address Text Box will become available
- Enter the appropriate address in the Address Text Box
- Enter the Port Number
- Click the Save Button at the bottom of the screen.
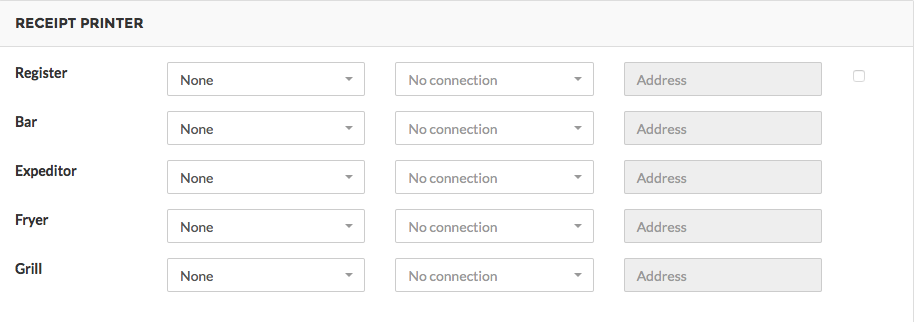
HOW TO ASSIGN RECEIPT PRINTERS TO A REGISTER
Your business can have many Receipt Printers connected to a single Register. For example, if you run a restaurant, you would likely have a Receipt Printer at the Register to print Receipts for the customer, as well as Printers at the Bar and Kitchen Stations to print Receipts that will include only Items that have been configured to print at that Station (i.e. Only Drink Items will print at the Bar Station and Food Items that need to be prepared by the kitchen will print at the Kitchen Station). For information on configuring your printer(s), click here.
To assign a Printer(s) to a Register, click Store Setup in the Navigation Menu and then select Registers in the Expanded Menu. On the Registers Page, click the Edit Register Button, represented by a Pencil Icon, to the left of the Register to which you wish to assign a Printer(s).
In the Receipt Printer Panel on the Edit Register Page, click the drop down menu next to the Station Printer you wish to assign to the Register. You may assign as many Printers to the Register as necessary. After selecting the Station Printer(s), the Connection Drop Down Menu will become available; click on it and select how your Register will connect to the Scanner (via Bluetooth, USB, or TCP/IP). Once you select your Connection Type, if a Bluetooth Address or IP Address is required, the Address Text Box will become available. You will need to enter the appropriate address in this text box to ensure that the Register and Printer can connect properly. Click the Save Button at the bottom of the screen.
QUICK SUMMARY
- Click Store Setup in the Navigation Menu.
- Click Registers in the Expanded Menu.
- Click the Edit Button next to the Register to which you wish to assign a Printer
- In the Receipt Printer Panel, click the drop down menu next to the Station Printer(s) you wish to assign to the Register
- Choose which Printer you would like to assign to the Register for each Station
- In the Connection Drop Down Menu, select how your Register will connect to the Accessory Display
- If a Bluetooth Address or IP Address is required, the Address Text Box will become available
- Enter the appropriate address in the Address Text Box
- Click the Save Button at the bottom of the screen.
Concept Information
Related Tasks