Locations
The Locations Page enables you to quickly and easily view a list of your Locations, edit Location details, add Locations, and copy Locations. For the purposes of the Vital Select a Location represents a physical location where you use Vital Select to take payments and complete transactions.
Note:
This document provides information regarding viewing Locations, editing Location details, adding Locations, and copying Locations. Information regarding changing Location settings for Discounts, Taxes, Stations, etc. is available here.
View Locations
The Locations Page allows you to quickly see a list of Locations that have been added to the Back Office for your business. Locations are displayed as rows in a table with six columns that provide more information about each Location. If your business has one Location, it will be the sole Location in the list.
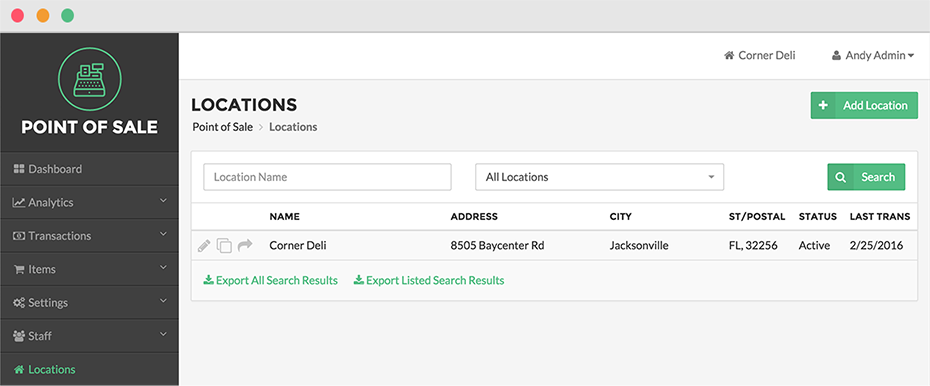
The columns are Name, Address, City, State & Postal Code, Status, and Last Transaction Date. By default Locations are displayed in alphabetical order by the Location name. However, if you would like the list of Locations to be displayed according to a different order, click on the column name by which you wish the list to be ordered. For example, if you have multiple Locations spread across multiple cities, click on the City column to order the Locations in the list by the city where the Locations are located.
You can search for a Location or multiple Locations by Location Name by entering a name into the Location Name search box that appears above the Locations list. You can also filter the Locations list by the Location status. For example, to see only active Locations in the list, click on the dropdown menu labeled All Locations and select Active from the dropdown options. It is also possible to Search by Location Name and filter the results by Location status by entering a search term into the Location Name search box, selecting a status from the All Locations dropdown menu, and clicking on the Search Button.
Add Location
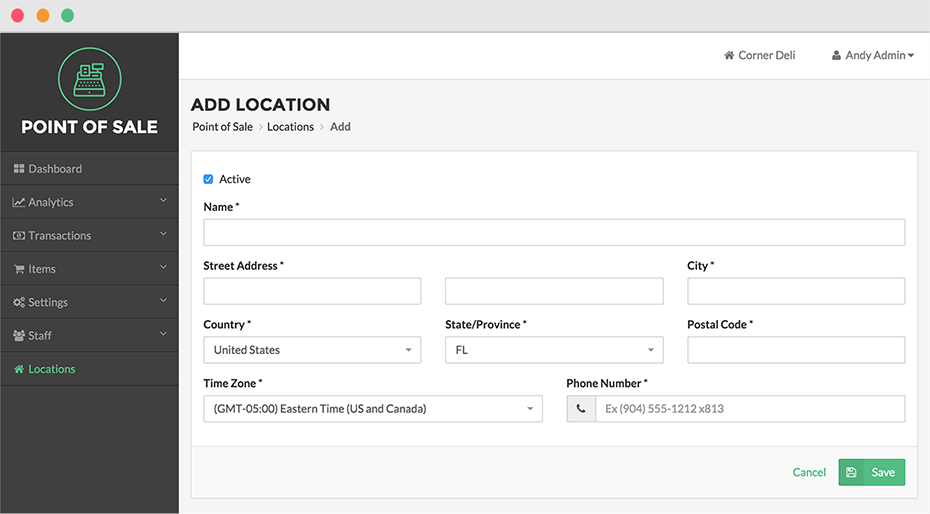
The Locations Page enables you to add new Locations to your business by clicking the Add Location Button.
Adding a new Location is a two-stage process. In the first stage, you will simply need to provide Location details like Name, Street Address, City, Country, State, Postal Code, Time Zone, Phone Number, and set the Location status. In the second stage, after entering the relevant Location details and clicking Save, the Edit Location Page will load and you will be able to edit the Location you added during the first stage.
Status – Set the Location status by clicking the checkbox that is labeled Active. When the Location status is set to Active users with the proper permissions will be able to log into Vital Select for that Location and perform actions for which they have proper permissions. When the status is set to Inactive, the Location will no longer be available through Vital Select or Back Office except for reporting purposes. For example, you will not be able to login to Vital Select for the inactive Location and you will not be able to process transactions or take payments for that Location.
Name – Location names must be unique for your business. Location names will be displayed to customers wherever it is necessary to identify your Location, e.g. printed and digital Receipts.
Time Zone – The time zone you select here will be used wherever a time is used for this Location. For example, transaction information and the reports that are generated using your transaction information will reflect the Time Zone selection you make. Similarly, on your print and email customer receipts, the time of the transaction will reflect your Time Zone selection.
After entering the relevant information, you can click Save. This will cause the Back Office to add the Location to your business and load the Edit Location Page.
Edit Location
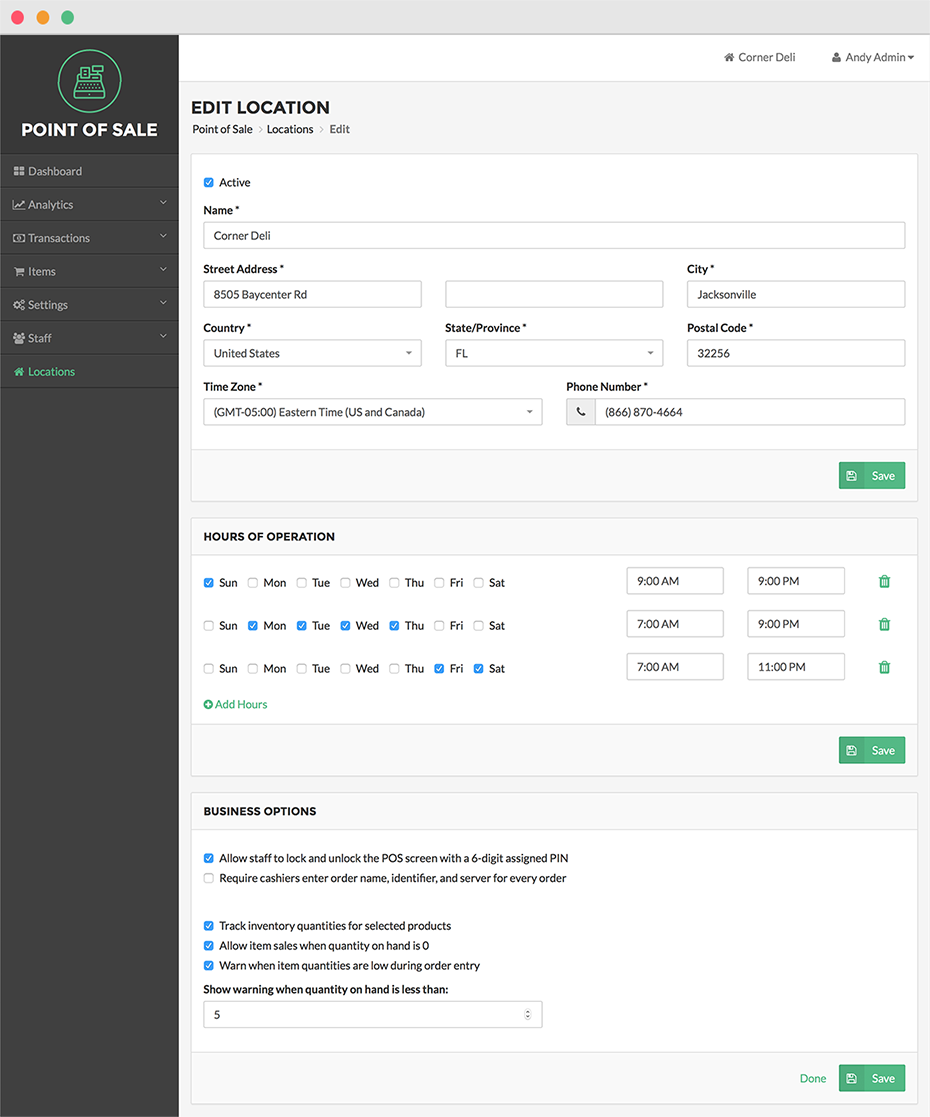
The Locations Page enables you to edit Locations by clicking the Edit Button - represented by a pencil icon that appears to the left of each Location name in the Locations list. The Edit Location Page is organized into several panels that allow you to edit various Location details, set Hours of Operation, and set various Business Options.
Location Details
The Location status and the following Location details can be edited from the Edit Location Page – Location Name, Street Address, City, Country, State, Postal Code, Time Zone, and Phone Number.
For more information about Location details, see the Add Location Section above.
Hours of Operation
The Hours of Operation panel allows you to set and edit your Location’s hours of operation by selecting a day or multiple days and entering the Open and Close Time for the selected days. The Hours of Operation you set here will be displayed to your customers in Rapid Loyalty merchant details. If you have Order Ahead enabled, customers will be able to place orders with pick-up times that are limited to the Hours of Operation you have entered here.
Get more information about Rapid Loyalty here.
Click Add Hours to add as many entries as you need. This allows you to create multiple time ranges within a single day of the week or multiple days of the week. For example, if your business is a food truck that only operates during the lunch hour 12-1 PM and between 5 & 7 PM on Monday through Friday, you would click Add Hours to create 2 lines of time controls. To add your lunch hour you would select the Monday through Friday checkboxes and enter 12:00 AM as the Open Time and 1:00 PM as the Close Time in the first line of time controls. To add your second Hours of Operation entry, you would select the Monday through Friday checkboxes and enter 5:00 PM as the Open Time and 7:00 PM as the Close Time in the second line of time controls.
You can delete an entire Hours of Operation entry, by clicking on the Delete Button represented by a trash can icon.
When you are finished with editing the information in the Hours of Operation Panel, click Save. This will cause the Back Office to save your edits to the information in the Hours of Operation Panel and only the information in the Hours of Operation Panel.
Business Options
The Business Options panel allows you to enable and disable Lock Screen and PIN Unlock functionality, Mandatory Order Information Entry, and Inventory Quantity Tracking.
Allow Staff to Lock and Unlock the POS screen with a 6 Digit
To maintain the security of Vital Select and prevent unwanted usage, Vital Select can be configured to allow you to lock the app and to unlock it again by providing a PIN. You can also use the Lock Screen and PIN Unlock functionality to enable fast user switching.
To enable Lock Screen and PIN Unlock, put a check by the option labeled “Allow staff to lock and unlock the POS screen with a 6 Digit”.
For more information regarding Lock Screen and PIN Unlock functionality click here.
Require Cashiers Enter Order Name, Identifier, And Server For Every Order
This option enables you to make the entry of Order Name, Order Identifier, and Server mandatory. If this option is enabled, the Register process will be changed so that the Order Info Pop-up will be displayed and the requested information entered, before the Checkout process is initiated.
For more information about viewing and editing Order Info click here.
Track Inventory Quantities for Selected Items
Vital Select is capable of tracking the quantity on hand for items that you configure to be tracked.
When inventory tracking is enabled and you have provided starting quantities for the relevant items, Vital Select will track configured items as they are sold or returned and increment or decrement the item quantity as appropriate.
Warn When Item Quantities are Low During Order Entry - Vital Select can also be configured to display a Low Quantity Warning Pop-up during the Checkout Process or when an Order is being put on Hold, if the Order includes an item with a quantity that has fallen below the threshold you have configured. To enable Low Quantity Warnings, enable the option and enter a number that you wish to use as the low quantity threshold. All items that are configured for tracking will use this number as the Low Quantity threshold.
Allow Item Sales When Quantity On Hand Is 0 – When this option is disabled, Vital Select will prevent the completion of the Checkout Process and the Hold Order Process for any order with an item that has a quantity of zero until that item is removed from the order. Enabling this option will cause Vital Select to allow such orders to go through the Checkout Process and allow such orders to be put on Hold.
Copy Location
Back Office enables you to quickly add a new Location with identical settings to an existing Location by copying the existing Location and its settings. This functionality allows you to create one reference Location and then quickly create multiple new Locations without having to go through process of configuring every setting for every new Location. You can copy a Location by clicking the Copy Button that appears next to the Location you wish to Copy.
The Copy Location Page is divided into two panels, the first panel allows you to enter the Location details for the new Location you will create, and the second panel enables you to select which settings you want to Copy from an existing Location.

Location Details
The first panel will enable you to enter Location details such as Name, Address, Time Zone, and Phone Number. You will also be able to set the Status for your new Location.
For more information about Location details, see the Add Location Section above.
Copy Settings
The second panel on the Copy Location Page enables you select which settings will be copied from the existing Location to the new Location that will be created.
By default, all existing settings will be selected for copying. If you do not wish to copy certain settings un-check the checkbox next to the settings you do not wish to copy.
When you have completed entering new Location details and selecting which settings you wish to Copy, click on the Copy Button. This will cause the Back Office to add a new Location to your business, using the Location details you provided and Copying the settings you selected from the existing Location.
If you wish to cancel without creating a new Location, simply click Cancel.