How to Configure the Timeclock
To configure the Timeclock using the Portal, begin by selecting Settings on the left side of the Timeclock Navigation Menu, and then select Configuration from the listings. This will direct you to the Timeclock Configuration page.
Note:
Timeclock Settings are Location-based, so you will need to select a Location from the Location Drop Down Menu before you can begin making changes on this page. If your business only has one Location, you will automatically be directed to the Configuration Page with the Location context set for you.

On the Configuration Page, enter the information needed to properly configure the Timeclock for the location, and then choose wether or not to Enable or Disable the Timeclock for the Vital Select app. When finished, select the Save button located on the bottom right side of the screen.
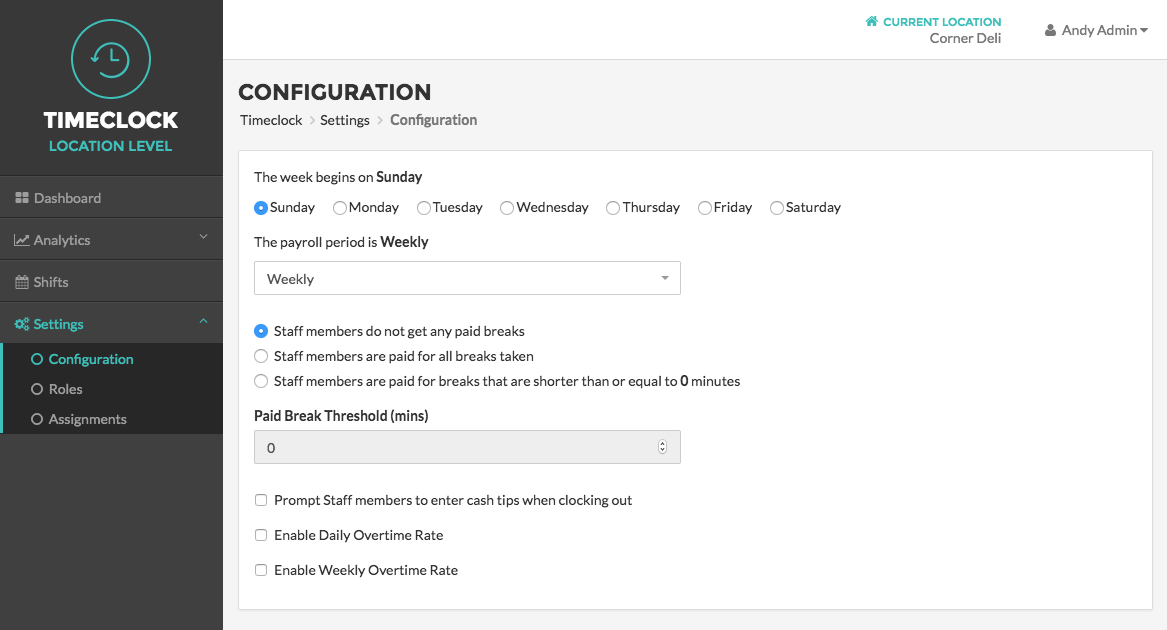
Payroll Period
The first setting you will need to configure is your Payment Period. There are five Payment Period options to choose from: Weekly, Bi-Weekly, Semi-Monthly (1st and 15th), Semi-Monthly (15th and Last), and Monthly. If you choose Weekly, Bi-Weekly, or Monthly, you will also need to select the day of the week that you wish to begin the Payroll Period on.
Break Settings
Next, you select your Break Settings. You can choose either to pay employees for all breaks taken, or to pay employees only for breaks that are shorter than a certain amount of time. For example, you may choose to pay for breaks that are shorter than 30 minutes, but not to pay for any break that goes over 30 minutes. You will need to select the radio button next to the type of paid breaks you want to allow, and if you chose the restrict paid breaks by time, you will need to enter the number of minutes that will be considered a paid break.
Cash Tips
Below the Break Settings you will see a checkbox next to the message “Prompt Staff to enter cash tips when checking out.” By checking this box, anytime an employee checks out using the Timeclock on the Vital Select, a message will appear promting the employee to enter the amount of cash tips they earned during their shift. This does not require the employee to deposit the tips into the cash drawer, but rather is simply a way for you to keep track of how much your employees are earning in tips.
Overtime Settings
You will then set up your Overtime Settings. You can choose to enable Daily Overtime, Weekly Overtime, or both Daily and Weekly Overtime for your employees. To enable Daily Overtime, check the box next to Enable Daily Overtime Rate. You will then need to enter the number of Daily Hours that are considered normal working hours. That way, when an employee clocks more than the specified number of hours for a single day, they will begin getting paid the Overtime Rate. For example, you will likely want to set the Daily Hours to 8, so if an employee works more than 8 hours in one day, he/she will be paid Overtime for the extra hours. You also need to set the Overtime Rate, for instance 1.5 would indicate that when an employee works over 8 hours, they are paid their standard wage plus half of their standard wage for the Overtime Hours.
Similarly, to enable Weekly Overtime, check the box next to Enable Weekly Overtime Rate, set the number of Weekly Hours that are considered normal working hours, and determine the Overtime Rate. You can choose to enable both Daily and Weekly Overtime, which would mean each day an employee works overtime they are paid the Overtime Rate for the extra Daily Hours, and if they exceed the set number of normal Weekly Hours, they will be paid the Weekly Overtime Rate for those additional hours as well.
Enable or Disable Timeclock Module In-App
To use the Timeclock Module on your Vital Select you will need to enable it on the Configuration Page. To do so, simply select the button next to Enable Timeclock option. If you are using a different method to track employee shifts and hours, select the button next to Disable Timeclock option.

Step by Step Summary
- Select Settings on the left side of the Timeclock Navigation Menu, and the choose Configuration from the listings.
- Enter the Information needed.
- Choose to Enable or Disable the Timeclock.
- Select the save button at the bottom right side of the page.
Concept Information
Related Tasks