Timeclock Settings
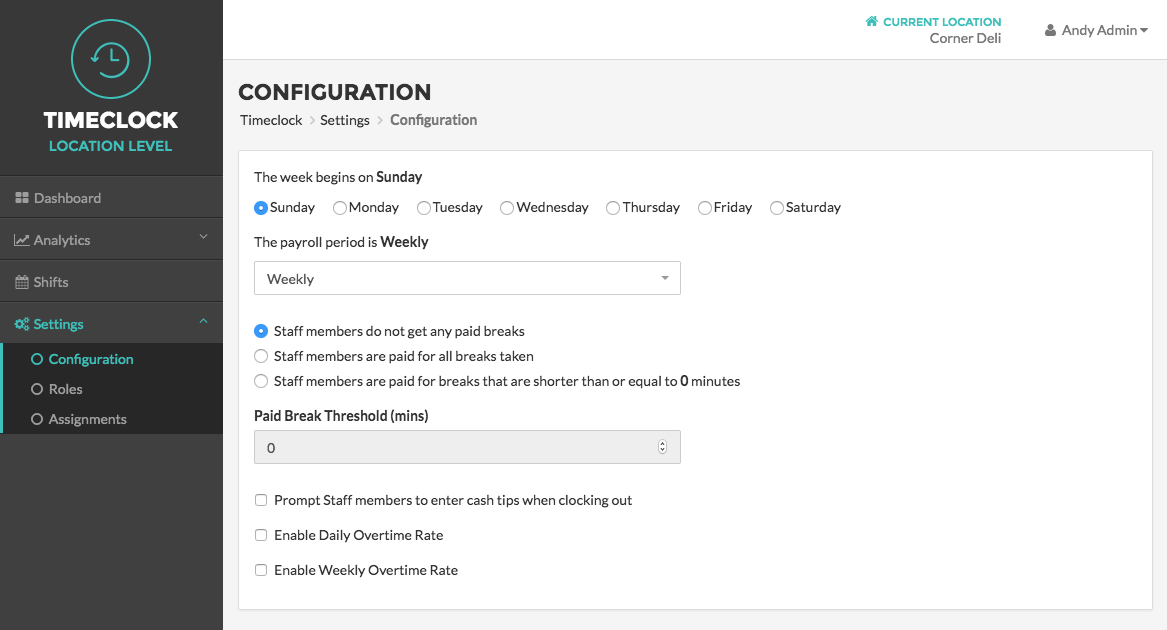
Configuration
On the Configuration Page, you can create your desired settings for your Timeclock. Here you decide everything from the Payroll Period to Overtime Rates for each of your business’s Locations. Because these settings are Location-based, you will need to select a Location from the Location Drop Down Menu before you can begin making changes on this page. If your business only has one Location, you will automatically be directed to the Configuration Page with the Location context set for you.
Enable Timeclock Module In-App
To use the Timeclock Module on your Vital Select you will need to enable it on the Configuration Page. To do so, simply select the button next to Enable Timeclock option. If you are using a different method to track employee shifts and hours, select the button next to Disable Timeclock option.
Payroll Period
The first setting you will need to configure is your Payment Period. There are five Payment Period options to choose from: Weekly, Bi-Weekly, Semi-Monthly (1st and 15th), Semi-Monthly (15th and Last), and Monthly. If you choose Weekly, Bi-Weekly, or Monthly, you will also need to select the day of the week that you wish to begin the Payroll Period on.
Break Settings
Next, you select your Break Settings. You can choose either to pay employees for all breaks taken, or to pay employees only for breaks that are shorter than a certain amount of time. For example, you may choose to pay for breaks that are shorter than 30 minutes, but not to pay for any break that goes over 30 minutes. You will need to select the radio button next to the type of paid breaks you want to allow, and if you chose the restrict paid breaks by time, you will need to enter the number of minutes that will be considered a paid break.
Cash Tips
Below the Break Settings you will see a checkbox next to the message “Prompt Staff to enter cash tips when checking out.” By checking this box, anytime an employee checks out using the Timeclock on the Vital Select, a message will appear promting the employee to enter the amount of cash tips they earned during their shift. This does not require the employee to deposit the tips into the cash drawer, but rather is simply a way for you to keep track of how much your employees are earning in tips.
Overtime Settings
You will then set up your Overtime Settings. You can choose to enable Daily Overtime, Weekly Overtime, or both Daily and Weekly Overtime for your employees. To enable Daily Overtime, check the box next to Enable Daily Overtime Rate. You will then need to enter the number of Daily Hours that are considered normal working hours. That way, when an employee clocks more than the specified number of hours for a single day, they will begin getting paid the Overtime Rate. For example, you will likely want to set the Daily Hours to 8, so if an employee works more than 8 hours in one day, he/she will be paid Overtime for the extra hours. You also need to set the Overtime Rate, for instance 1.5 would indicate that when an employee works over 8 hours, they are paid their standard wage plus half of their standard wage for the Overtime Hours.
Similarly, to enable Weekly Overtime, check the box next to Enable Weekly Overtime Rate, set the number of Weekly Hours that are considered normal working hours, and determine the Overtime Rate. You can choose to enable both Daily and Weekly Overtime, which would mean each day an employee works overtime they are paid the Overtime Rate for the extra Daily Hours, and if they exceed the set number of normal Weekly Hours, they will be paid the Weekly Overtime Rate for those additional hours as well.
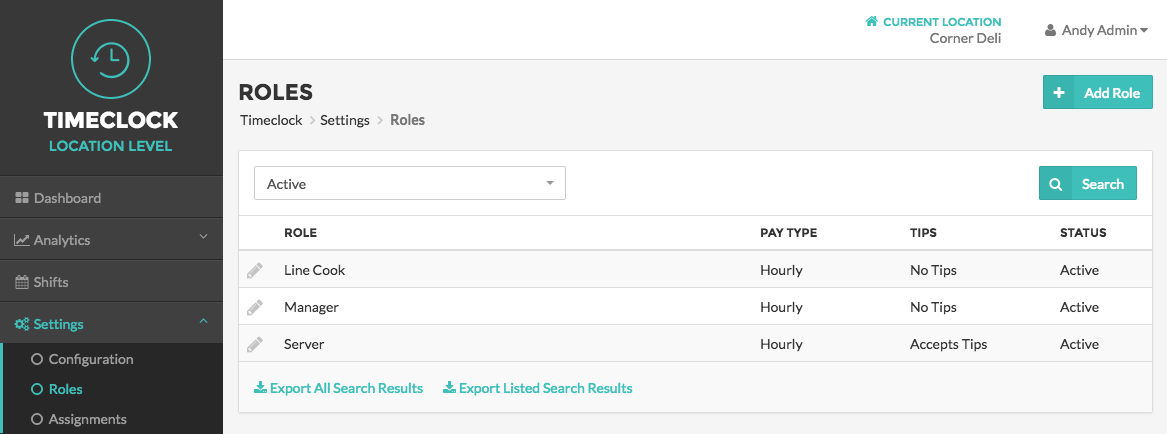
Roles
On the Roles Page, you can view, add, and edit the Roles for each Location of your business. Roles represent the different types of job positions you have. For example, if you run a restaurant, you might have Roles for Servers, Managers, and Chefs. Once you create these general Roles, you will then assign specific Roles to the employees.
Your business’s Roles may vary from Location to Location, so if you are a multi-unit operator, you will need to select a Location from the Location Drop Down Menu before you can view the Roles Page. If you are a single-unit operator, the Roles Page will load automatically. On the Roles Page, you will see the Role Table filled in with the created Roles for the selected Location. The Role Table is organized in the following columns:
Role Name:
The name you assign for the Role. For example, Cashier, Manager, Server.
Pay Type:
Shows whether the Role is paid on an Hourly basis or a Salary basis.
Tip Status:
The Role can either accept tips and the table will display Accepts Tips in this column, or cannot accept tips and the table will display No Tips.
Locations:
This column will display a number, representing how many Locations where the Role is available. If you are a single-unit operator, this column will not show on your Role Table.
Status:
This column will display either Active or Inactive, depending on the assigned status of the Role. If a Role is Active at a Location, staff members will be able to Clock In as that Role on the Vital Select. If the Role is Inactive, the Role will not be available on the Vital Select.
You may search the Roles Table by Status by clicking the drop down at the top of the table, selecting either Active or Inactive, and then clicking the Search Button.
Adding and Editing Roles
To add a new Role, click the Add Role Button in the top right corner of the Roles Page. You will be taken to the Add Role Page where you will input the Role Name and select the Pay Type, Status, and if the Role can accept tips. Press the Save Button to save the Role, or the Cancel Button to return to the Roles Page without creating the Role.
Similarly, to edit an existing Role, click the Edit Button, represented by a Pencil Icon to the left of the Role Name in the Role Table. You will be taken to the Edit Role Page where you can change the Role Name, Pay Type, Status, and if the Role accepts tips or not. Press the Save Button to save your changes to the Role, or the Cancel Button to return to the Roles Page without saving your changes.
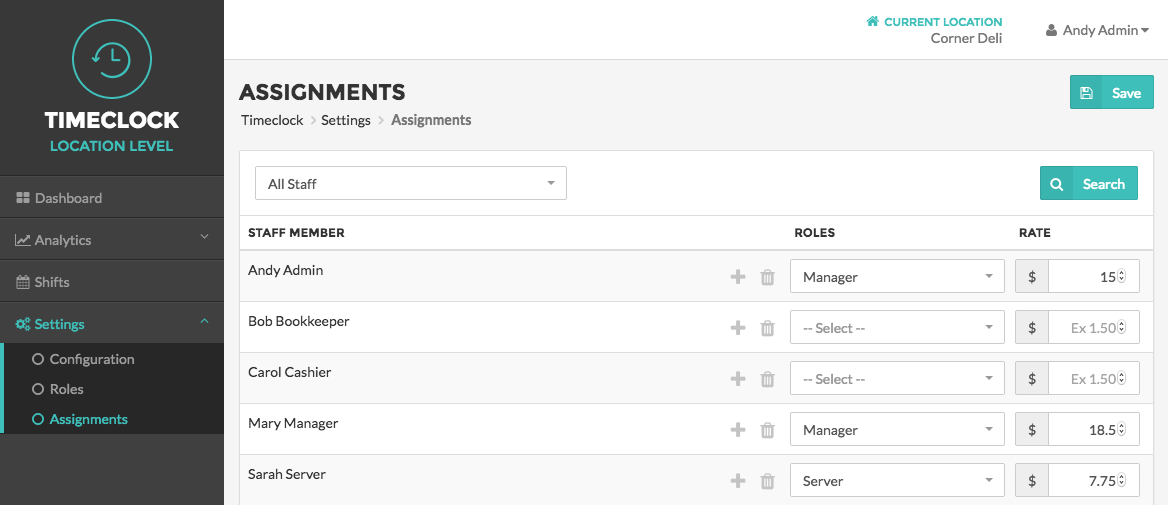
Assignments
On the Assignments Page you can assign Roles and Rates to existing Users that you have assigned to each Location in the POS Module. Since Roles can vary from Location to Location, assignments must also be made on a Location basis. This means that if you are a multi-unit operator, you will need to select a Location from the Location Drop Down Menu before you can view the Assignments Page. If you are a single-unit operator, the Assignments Page will load automatically.
On the Assignment Page you will see the Role Assignment Table with three columns, Staff Member, Role, and Rate, as well as an Add and Delete Button.
Staff Member:
The full first and last name of the employee.
Role:
This column will have a drop down menu with all of the Roles that you have made Active for this Location. For each employee, click the drop down menu and select a Role for them in this column.
Rate:
This column has an input field where you can enter the dollar amount that each User is paid hourly for the assigned Role.
Add Button:
The Add Button, represented by the plus symbol, adds a row for an employee where you can select another Role and input the Rate for that Role. For example, you may have an employee that works as both a Cashier paid at $10/hour and a Server at $8/hour. In this case, you would press the Add Button across from the employee’s name and in the first row select Cashier from the Role Drop Down and enter 10 in the Rate column, and in the second row select Server from the Role Drop Down and enter 8 in the Rate column.
Delete Button:
The Delete Button, represented by the trash can icon, either clears the assignments for an employee if clicked in the first row, or deletes the row entirely for any secondary Roles added.
Once you have finished entering the necessary information for each User, press the Save Button at the top of the page. It is important to note that if a Role is assigned to a User, a Rate must also be provided. If you try to save your changes without assigning a Rate for a Role, you will get an alert to update the table before your changes can be saved.