How to Edit Items for a Location
Edit the Price or Cost of an Item
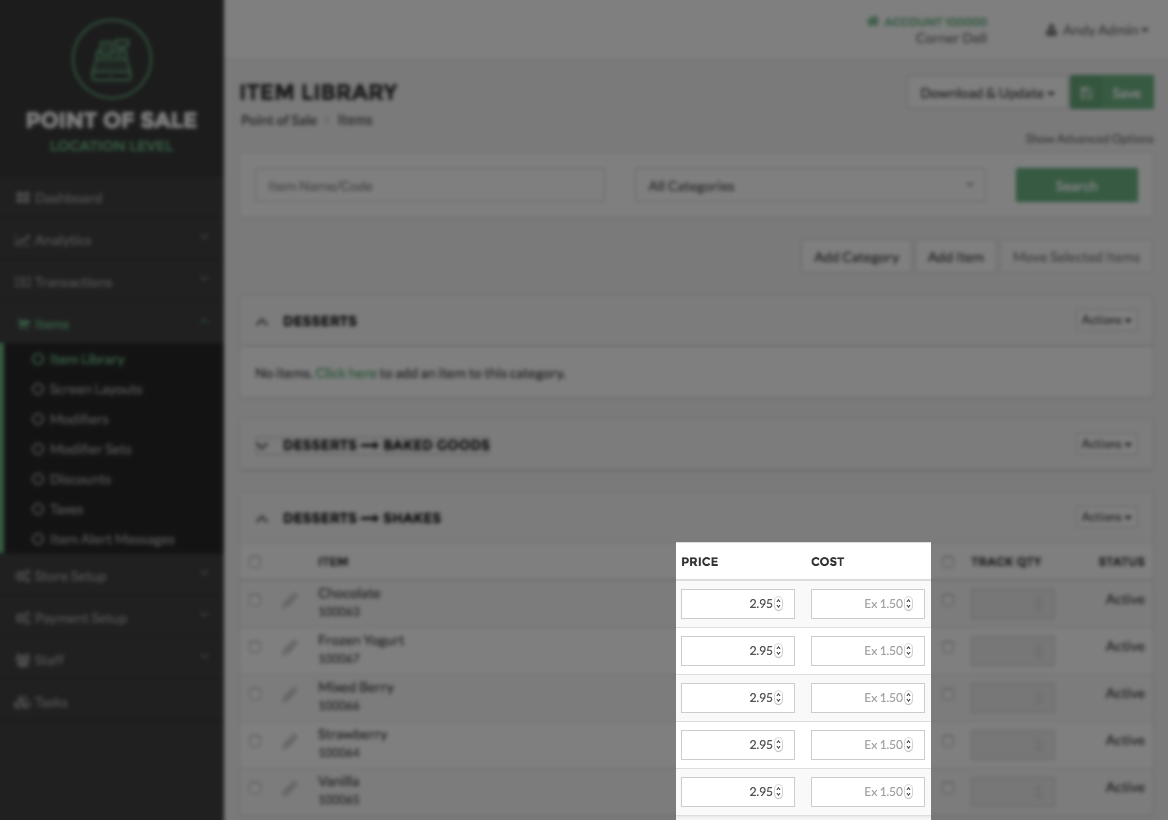
To Edit the price or cost of an Item, begin by selecting Items on the left side of the Navigation Menu, and then Select Item Library from the listings.
Locate the Item for which you would like to edit the cost for. In the Price Column, enter the price of the Item in the Price Field; and/or In the Cost Column, enter the cost of the Item to your business in the Cost Field. When finished, click the Save Button at the top of the page.
Step by Step Summary
- Select Items on the left side of the Navigation Menu, and then choose Item Library from the listings
- In the Price Column, enter the price of the Item in the Price Field; and/or
- In the Cost Column, enter the cost of the Item to your business in the Cost Field
- Click the Save Button at the top of the page when finished
Change or Assign a Station Printer to a Item
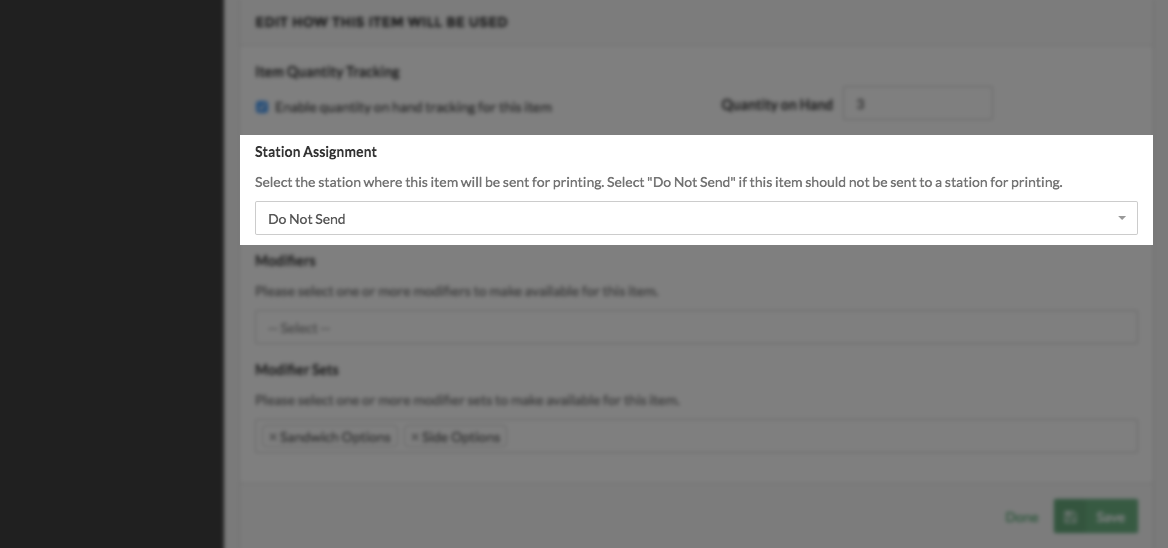
Select Items on the left side of the Navigation Menu, and then choose Item Library from the listings. Locate the Item for which you would like to assign a Station Printer or change the current Station Printer. Select the edit button, represented by a Pencil Icon, located on the left side of the Item Name. Scroll down until you see the Station Assignment option, and then select an option form the dropdown menu that appears. For information regarding Printer configuration, click here.
Step by Step Summary
- Select Items on the left side of the Navigation Menu, and then choose Item Library form the listings.
- Locate the Item you choose to edit the Station for, and the select the edit button, located on the left side of the Item name.
- Scroll down until you see the Station Assignment section.
- Select on option from the dropdown menu that appears
- Click the Save Button at the top of the page when finished
Track the Quantity of a Item
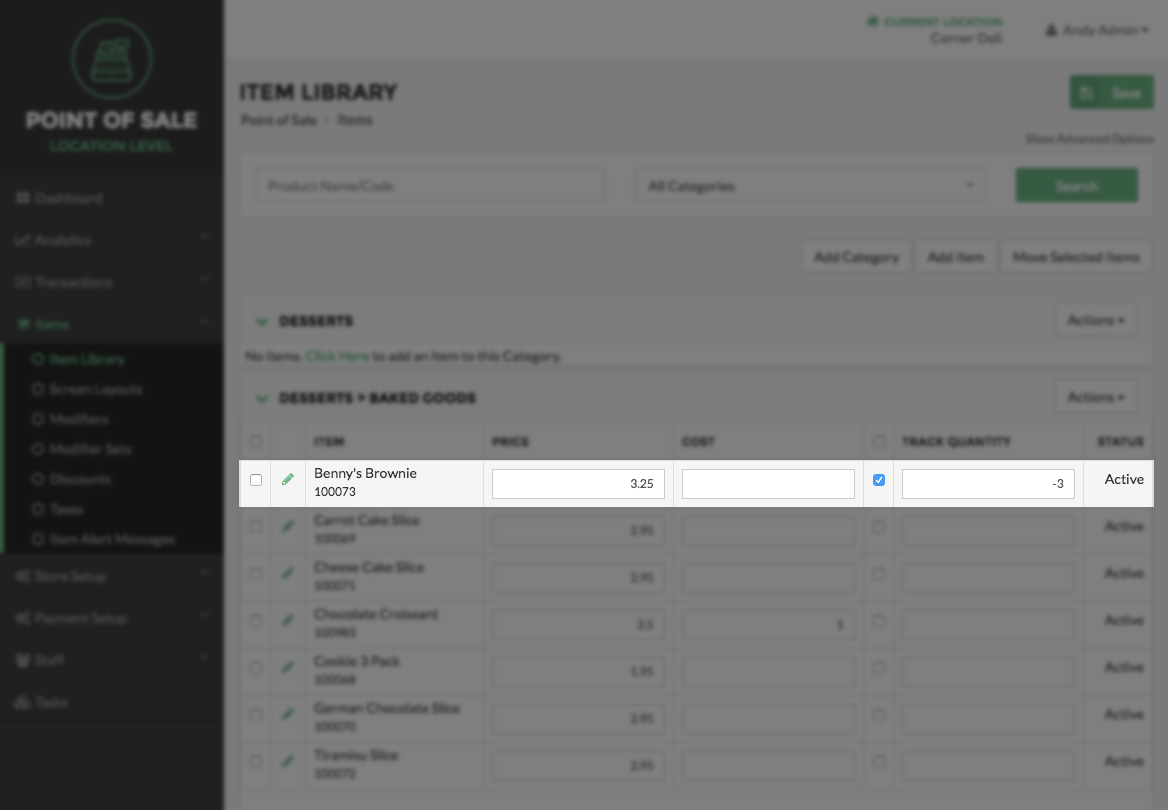
To enable Item Tracking for Items, begin by selecting Items on the left side of the Navigation Menu, and then choose Item Library from the listings. It is important to note than tracking Items is Location-specific, so if your business has multiple Locations, you will need to first select which Location you want to enable tracking for your Items. Once you are on the Item Library page, you will see your Items listed in multiple tables, depending on how you have organized them. In each table, there is a column named Track Qty, indicating Track Quantity. To enable a Item for tracking, check the box next to the text box in the Track Qty column for that Item. Then enter the amount of the Item you have on hand in the text box. To disable tracking for that Item, simply uncheck the box. When you are done editing, click the Save Button in the top right corner of the screen.
![]()
Quick Summary
- Select Items on the left side of the Navigation Menu, and the choose Item Library from the listings
- If your business has multiple Locations, you will need to first select which Location you want to enable tracking for your Items
- To enable a Item for tracking, check the box next to the text box in the Track Qty column for that Item
- Enter the amount of the Item you have on hand in the text box
- To disable tracking for that Item, simply uncheck the box
- When you are done editing, click the Save Button in the top right corner of the screen
Set Order Ahead Availability
To make an Item available for Order Ahead, start by selecting Items on the left side of the Navigation Menu, and then choose Item Library from the listings. Next locate the Item you wish to make Order Ahead available for, then select the edit button represented by a pencil, on the left side of the Item name. This will direct you to the Edit Item page.
On the Edit Item screen, under the Edit Where This Item Will Appear section, locate the Order Ahead section. Then select the checkbox on the left side of the This Item is Available for Order Ahead field. Select the Save button at the top or bottom right side of the screen to save your work.

Step by Step Summary
- Select Items on the left side of the Navigation Menu, and then choose Item Library under the listings.
- Locate the Item you wish to make available for Order Ahead, and select the edit button represented by a pencil.
- Find the Where this Item Will Appear section the locate the Order Ahead Section.
- Select the checkbox on the left side of the This Item is Available for Order Ahead field.
- Select the Save button at the top or bottom right side of the screen.
How to Download and Update Item Inventory Data
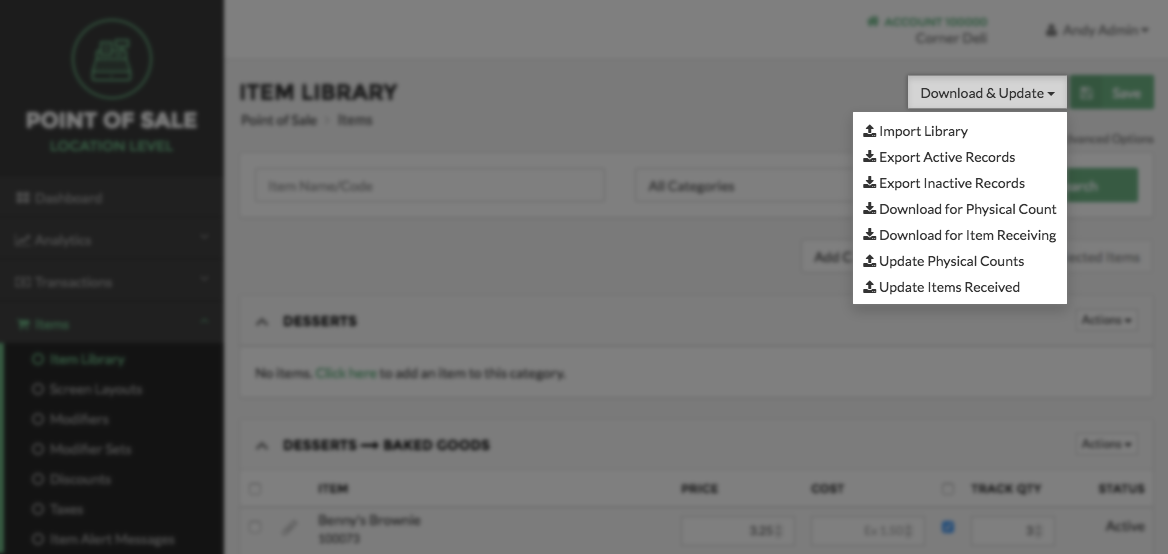
Select Items on the left side of the Navigation Menu, and then choose Item Library in the listings. Select the Download and Update Drop Down Menu to the right of the Save Button. Select whether you would like to update data for the Physical Count or Items Received method of Inventory tracking.
Step by Step Summary
- Select Items on the left side of the Navigation Menu, and then choose Item Library from the listings.
- Select the Download and Update Options Drop Down Menu arrow to the right of the Save Button
- Select whether you would like to download or update data for the Physical Count or Items Received method of Inventory tracking
Concept Information
Related Tasks
How to Add a Subcategory or Group
How to Delete Categories, Subcategories, or Groups
How to Deactivate or Reactivate a Category Subcategory Group or Item
How to Edit a Category Subcategory or Group
How to Move Categories, Subcategories or Groups
How to Automatically Create Item Screens From the Item Library
How to Manually Arrange Item Screens and Items
How to Move an Item or Multiple Items
How to Add an Item Alert Message
How to Edit an Item Alert Message
Printer Configuration and Troubleshooting
How to Edit Processor Information
How to Enable or Disable Tender Types
How to Set Discounts for a Location
How to View Taxes for a Location