How to Hold an Order
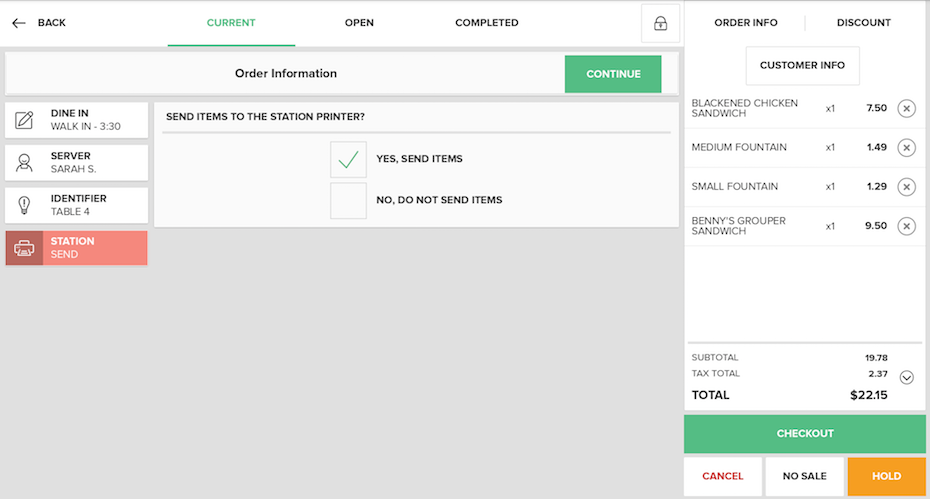
Selecting the Hold Button at the bottom of the Receipt Viewer holds an Order for completion at a later time, instead of immediately initiating the Checkout Process. To Hold an Order that includes Items that need to be sent to a station for printing, tap the Hold Button at the bottom of the Receipt Viewer; the Order Info Screen will load and present you with the option to send Items immediately or not to send Items to the preconfigured station at the moment.
Note:
If you choose “No, Do Not Send Items” you will need to send the Items to a Station Printer manually from the Open Orders Tab.

Order Type
You can designate a Held Order as Dine In, Carry Out, Delivery, or Drive Thru by tapping on the Order Type Button (the topmost button) in the left column. This screen also provides space to enter an Order Name.
Server
To change the Server associated with the Order, tap the Server Button in the left column, and then select the appropriate Server from your list of employees on this screen. The employee currently logged in and operating the app will be selected as the Server by default, so when the Order is placed on Hold they can access it from the My Orders Screen under the Current Tab. If they choose to change the Server associated with the Order, it will not appear on the My Orders Screen, but they will be able to locate it on the All Orders Screen of the Current Tab.
Order Identifier
To assign an Order Identifier to the Order, select the Identifier Button in the left column and then select the necessary Identifier Button to apply it to the Order.
Once you have finished entering the necessary information for the Order, press the Continue Button to place the Order on hold. You will be taken back to the Current Order Screen to begin a new Order.
Step by Step Summary
- After Items have been selected for an Order, click the Hold Button at the bottom of the Receipt Summary. The Order Info Screen will appear and the Station Button will be selected.
- Select either Yes, Send Items, or No, Do Not Send Items
- To designate a Held Order as Dine In, Carry Out, Delivery, Drive Thru or To Go, tap the Order Type Button (the topmost button) in the left column. Then select the button that corresponds to the appropriate Order Type for the Order
- You may also enter an Order Name on this screen by typing a name into the textbox
- To change the server associated with the Order, tap the Server Button in the left column, and then select the appropriate Server from your list of employees on this screen
- To assign an Order Identifier to the Order, select the Identifier Button in the left column and then select an Identifier
- Once you have finished entering the necessary information for the Order, press the Continue Button to place the Order on hold. You will be taken back to the Current Order Screen to begin a new Order
- The Held Order will now appear in the Open Tab on the All Orders Screen
Concept Information
Action Buttons for Held Orders
Receipt Viewer for Held Orders
Related Tasks
How to Enter an Item amount at time of use
How to Apply a Modifier to an Item
How to Increase Quantities in Orders
How to Split an Order by Items
How to View and Edit Order Info
How to Add partial quantities Using the App
How to Remove Items from an Order
How to Perform a Manager Override
How to Apply Tax Exempt to an Order
How to Apply Tax Exempt to a Manual Item